Cracking Kubernetes Authentication (AuthN) Model (2022)
Part of this post’s contents first appeared in User and workload identities in Kubernetes, which was kindly edited, re-illustrated and exemplified by learnk8s.io, and very friendly to beginners.
The version posted here in contrast has a biased focus on the design and implementation, as well as in-depth discussions.
Related posts:
- Cracking Kubernetes Node Proxy (aka kube-proxy)
- Cracking Kubernetes Network Policy
- Cracking Kubernetes Authentication (AuthN) Model
- Cracking Kubernetes RBAC Authorization (AuthZ) Model
TL; DR
This post digs into the Kubernetes authentication (AuthN) model. Specifically, we’ll start from analyzing the technical requirements of AuthN in Kubernetes then design one for it (assuming it hasn’t had one yet), the final solution has an end-to-end workflow like below:
Hope that after reading this post, readers will have a deeper understanding on how the Kubernetes AuthN module works (with strategies like static token, bearer token, X509 certificates, ServiceAccounts, OIDC, etc), as well as how to configure, use and manage it properly, either as administrators or developers.
- TL; DR
- 1 Introduction
- 2 Solution design
- 3 Implementation
- 4 Tests with the Kubernetes AuthN
- 5 Discussions
- 6 Conclusion
- References
1 Introduction
1.1 curl Kubernetes API and see what happens
As developers, we’ve been accustomed to curl a server to interact with it,
e.g. getting the content of a site’s homepage:
$ curl example.com # Yes, this site really exists
    ...
    <h1>Example Domain</h1>
    <p>This domain is for use in illustrative examples in documents. You may use this
    domain in literature without prior coordination or asking for permission.</p>
    <p><a href="https://www.iana.org/domains/example">More information...</a></p>
</html>
Now let’s do a similar test against the Kubernetes API server (kube-apiserver).
Suppose we would like to list all the namespaces in the cluster,
$ export API_SERVER_URL=https://10.5.5.5:6443

$ curl $API_SERVER_URL/api/v1/namespaces
curl: (60) Peer Certificate issuer is not recognized.
...
If you'd like to turn off curl's verification of the certificate, use the -k (or --insecure) option.
The output reminds us that the server is serving over https with an unrecognized
certificate (e.g. self-signed), so curl stopped us for potential unsafeties. But,
for test purposes we could just turn off the certificate verification and proceed on:
$ curl -k $API_SERVER_URL/api/v1/namespaces
{
  "kind": "Status",
  "apiVersion": "v1",
  "status": "Failure",
  "message": "namespaces is forbidden: User \"system:anonymous\" cannot list resource \"namespaces\" ...",
  "reason": "Forbidden",
  "details": { "kind": "namespaces" },
  "code": 403
}
OK, we got a response from the server, but it said that
we as user system:anonymous
are not allowed to list the namespaces resource (or accessing this API) in
this Kubernetes cluster, with a standard HTTP response code 403 (Unauthorized).
1.2 AuthN and AuthZ
The above test reveals some important working mechanisms in the kube-apiserver:
- First, it identifies the user of a request (who you are);
- Then, it determines what operations are allowed for this user (what permissions do you have);
Formally,
- The former process (identifing who you are) is termed AuthN, short for authentication;
- The latter process (determining what permissions an authenticated user has) is termed AuthZ, short for authorization.
The workflow looks like something as below:

Fig 1-1. AuthN and AuthZ when processing a client request
Regarding to our previous test case:
-
AuthN: we didn’t provide any user credentials, so vanilla authentication would fail; however, depending on whether anonymous access is allowed by
kube-apiserver:- 1.1 Disallow: return
401 Unauthorizeddirectly (note that this status code is a long-standing misnomer as it indicates authentication errors rather than authorization errors, thanks [4] for pointing this out); - 1.2 Allow: proceed on as
system:anonymoususer (our case) and go to the next stage (AuthZ);
- 1.1 Disallow: return
-
AuthZ: check if
system:anonymoushas the permission to list namespaces in the cluster,- 2.1 No: return 403 Forbidden (our case);
- 2.2 Yes: perform business processing;
Reasonable and clear.
In fact, each request to kube-apiserver should be tied to a user, or is
treated as an anonymous request. Here, the request
may come from a process inside or outside the cluster, or from a human user
typing kubectl, or kubelets on nodes, or members of the control plane.
The AuthN module in the server will authenticate the request with the credentials it provides, either
a static token, a certificate, or an externally-managed identity.
The AuthN module is vital (and inevitably, complex) as it is the first gatekeeper of the entire system. Let’s briefly describe what are required for this module.
1.3 Requirements of the AuthN module
To be a practical AuthN module as the one in Kubernetes, at least the following properties must be met:
- Support both human users and program users;
- Support both external users (e.g apps deployed in OpenStack or bare metal systems) and internal users (e.g. accounts created and managed by Kubernetes cluster itself);
- Support common AuthN strategies, e.g. static token, bearer
token, X509 certificate, OIDC (we don’t include BasicAuth here since it has
been removed from Kubernetes
v1.19, which essentially doesn’t provide any security mechanisms using encryption standards); - Support enabling multipel AuthN strategies simultanously;
- Extensibility: easy to add new AuthN strategies or phase out old ones;
- Optionally, support anonymous access (like the
system:anonymouscase we’ve seen above).
Now, if you’re an software engineer or achitect, on giving the above requirements, how would you design an AuthN solution that fits into the system?
1.4 Purpose of this post
This post try to answer the question by designing an AuthN module for Kubernetes by ourselves - just pretending that Kuberntes hasn’t had one yet. The workflow of the final design will look like below:
Fig 2-1. Workflow of the designed AuthN solution for Kubernetes
Hope that after reading this post, readers will have a deeper understanding about the design, configuration and usage of Kubernetes AuthN stuffs.
AuthN and AuthZ are tightly related, refer to our later post Cracking Kubernetes RABC Authorization Model for the AuthZ part.
2 Solution design
2.1 AuthN chain
One of our targets is being able to support multiple AuthN strategies simultanously, that is, some users can access via static tokens, some via certificates, and some others may via external identity providers (IdP, e.g. Keystone).
Effectively, this means that as long as we’ve authenticated the user with one strategy successfully, we should skip to try the remaing ones; only if all the strategies have been tried and failed (and anonymous access is disabled), we should treat this as an invalid user. This indicates the following chain design, which has the above described short-circuit property:
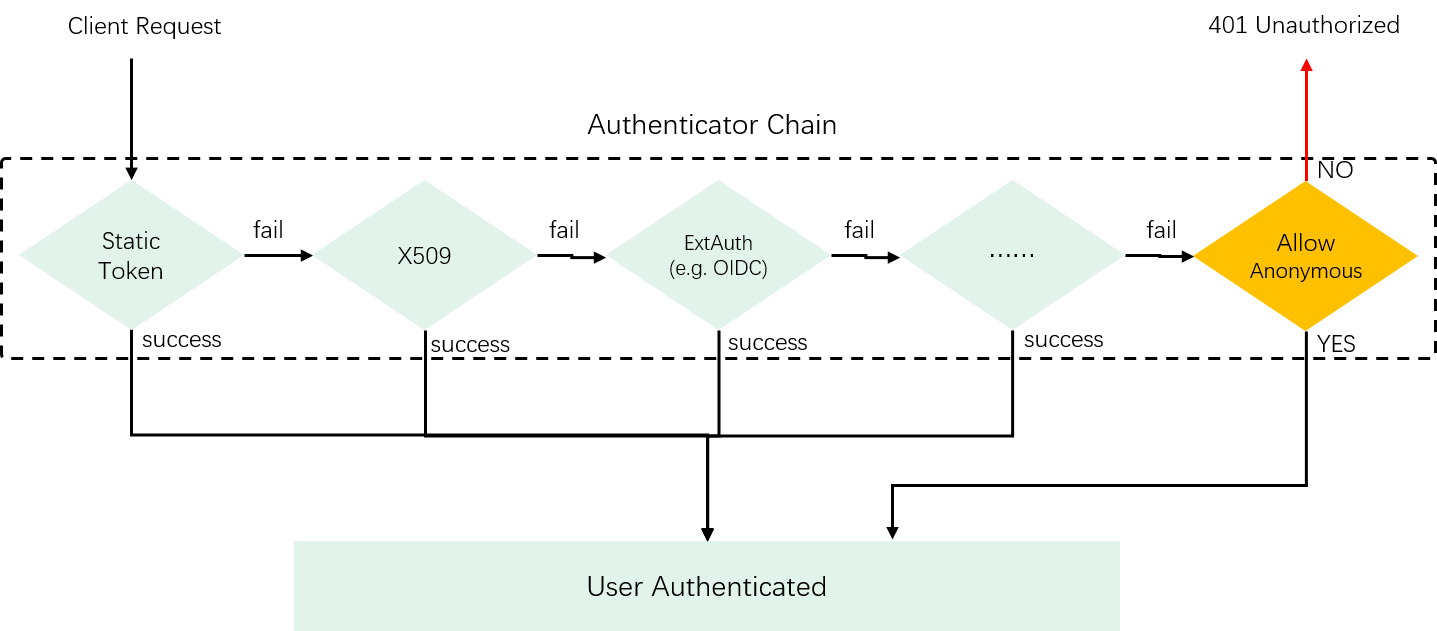
Fig 2-1. Short-circuit property of the AuthN chain
The chain design also makes extensability easy: just adding or removing given AuthN strategies to/from the chain.
2.2 Differentiate two kinds of users
Another requirement is to support different kinds of API users, as shown below:

Fig 2-2. Internal and external Kubernetes API users
Judging by whether the API user is inside the Kubernetes cluster, we can categorize users into the following two kinds:
-
Kubernetes managed users: the users (accounts) created by the Kubernetes cluster itself and used by in-cluster apps, we name them "service accounts";
-
Non Kubernetes managed users: users that are external to the Kubernetes cluster, e.g.
- Users with static tokens or certificates that provided by cluster administrators;
- Users authenticated through external identity providers like Keystone, Google account, and LDAP.
The implementation implication of this differentiation:
- The former are native Kubernetes objects, so we need to define a specification (data model) for them;
- The latter are not Kubernetes objects, so there will be no specification for them.
2.2.1 Introducing ServiceAccount
Servicea accounts by our design will typically be created by kube-apiserver
in an automatic way for applications deployed in the cluster, used
by the apps (pods) to access kube-apiserver.
Introducing ServiceAccount specification: bind an account name to a token
which stored in Kubernetes Secret format:
type ServiceAccount struct {
    metav1.TypeMeta
    metav1.ObjectMeta

    Secrets []ObjectReference          // To be used by pods running using this ServiceAccount, which
                                       // holds the public CA of kube-apiserver and a signed JWT token
    AutomountServiceAccountToken *bool // Whether to mount the secret into related pods automatically
}
Where the Secret model has already exists in Kubernetes model,
// https://github.com/kubernetes/kubernetes/blob/v1.23.1/staging/src/k8s.io/api/core/v1/types.go#L6005

type Secret struct {
    metav1.TypeMeta
    metav1.ObjectMeta

    Data map[string][]byte // base64 encoded, hold the ServiceAccount token
}
2.2.2 Introducing normal User
External users are not Kubernetes objects, so there is no need to create a data model for it.
However, for interacting with the subsequent AuthZ module, we must have the ability to deduce the user and group information from a given user token. This will be elaborated in the next section.
2.3 Faciliate AuthZ
If just considering AuthN, our chain design would be enough. But as has been said, if we’d like to integrate our AuthN module better to the system, we should do a little more - specifically, we need to feed some important information to the subsequent AuthZ module.
AuthZ checks what permissions a given subject has, where a subject may be a user, a user group, or a role. The question is: request headers only contain raw tokens or certificates, which can be recognized by the AuthN module, but is useless to the AuthZ module, the latter favors user/group/role information to fulfill its task. So,
-
To do our adjacent neighbor a favor, we (AuthN module) should transform the validated credentials to a corresponding user/group/role representation. We introduce the following interface for this purpose:
// Get user information from an authenticated token or credential. // Should be implemented by each authenticator. type Info interface { GetName() string GetUID() string GetGroups() []string GetExtra() map[string][]string } -
Then, we can insert the user information into the request context, and our neighbor can get from the context later.
-
Further, the
Authorizationheader will be useless once AuthnN finishes, so we can safely remove it.
With the above improvements, the updated flow would look like this:
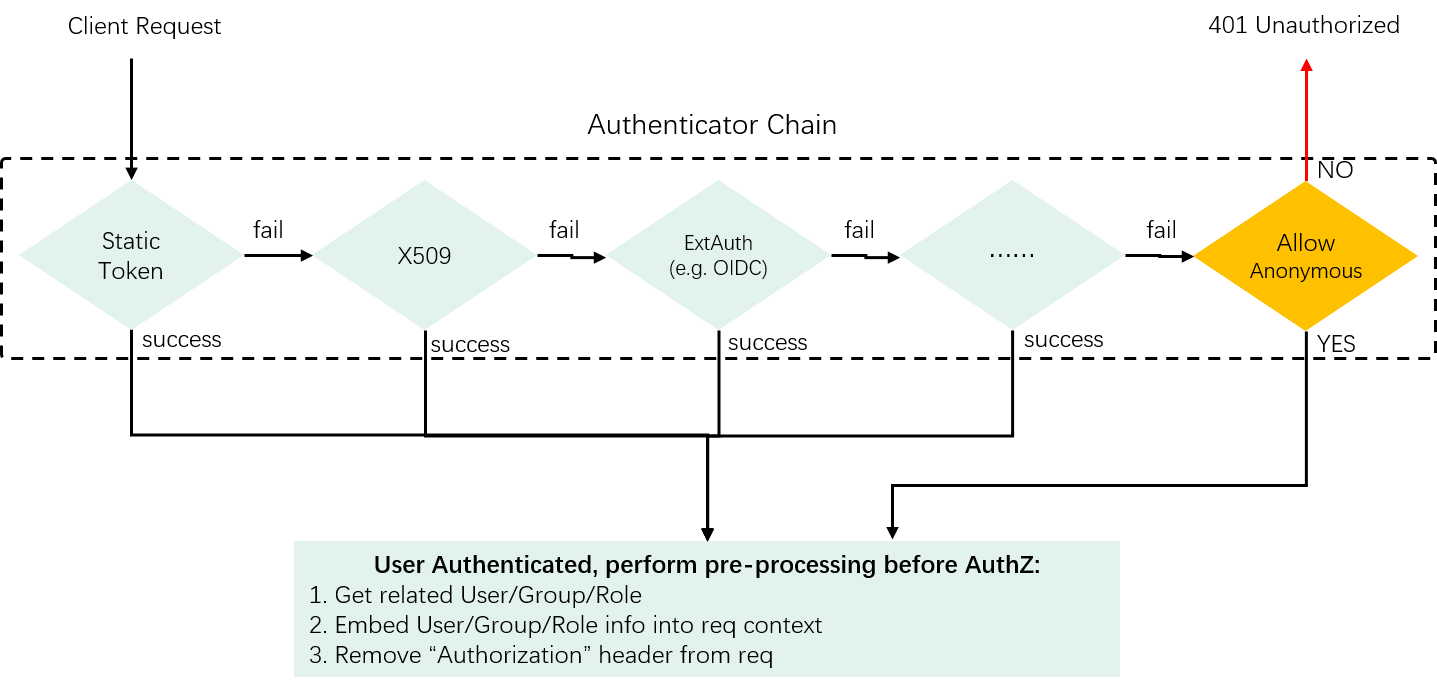
Fig 2-3. Transform AuthN credentials into user information to faciliate subsequent processings (e.g. RBAC AuthZ)
2.4 Hypothetical AuthN workflow
With all the above preparations, we’re ready to describe our AuthN workflow. On receiving a client request,
- Extract AuthN credentials from request header;
-
Authenticate the request against the authenticator list;
- On failure: return “401 Unauthorized”
- On success: add user info to request context and remove AuthN info from request header; goto next processing;
- If all authenticators failed and anonymous access enabled, try annonymous access;
2.5 Support specific AuthN strategies
Section will show how to implement the authenticators for each strategy. But, before that, let’s briefly describe the "bearer token" machanism.
Bearer authentication is an HTTP authentication scheme. Clients carry a token
in the Authorization header when making requests to the server, in the format
as below:
Authorization: Bearer <token>
The bearer token scheme was originally created as part of OAuth 2.0 in
RFC 6750, but can also be used on its own. So
AuthN strategies like static token authentication just place
their specific tokens into the <token> field via this mechanism. With this
said, let’s first see how to implement the static token authenticator.
2.6.1 Support static tokens (for out-of-cluster users/apps)
Static token is a simple machanism where cluster administrators generate some valid tokens (abitrary strings) and assign to API users. Users must carry such a token in their request headers when accesing the API.
Note that in this scenario, tokens are generated by administrators, he/she must also provide the correspoinding user information otherwise the Kubernetes AuthZ module would have no information to do permission judgement. With this said, here is our simple design,
-
Define the static token format:
<token,user,uid,gid>,$ cat /etc/kubernetes/static-tokens.csv # The last field (group id) is optional 31ada4fd-adec-460c,alice,123,456 22a38432-8bcb-cdcf,bob,124,457 ... -
Add a CLI option to
kube-apiserverto load the token file, e.g.--token-auth-file=/etc/kubernetes/static-tokens.csv.
The overall workflow is shown as below:

Fig 3-1. Support static token AuthN strategy
- Admin: create a CSV token auth file, present to Kubernetes cluster;
- Admin: start
kube-apiserverwith this is config, reading and caching the info in memory; - Admin: assign token to external users and/or apps;
- Client: carry the token in bearer token field (
Authorization: Bearer TOKEN) when sending requests; - Server (
kube-apiserver) AuthN: verify the token against the token list (and retrieve user information for AuthZ if authenticated);
With the above steps succeed, AuthZ will start (with the user information provided by AuthN), but this is beyond the scope of this post. See our later post Cracking Kubernetes RABC Authorization Model for the AuthZ part.
2.6.2 Support X509 certificate (for out-of-cluster users/apps)
Similar as static token, we can support X509 client certificate.

Fig 3-2. Support X509 certificate AuthN strategy
- Admin: prepare certificate authorities (CAs), which will be used to validate client certificates;
- Admin: start
kube-apiserverwith this is config (with a new option--client-ca-file=FILE); -
Admin: issue client certificates with root CAs to external users and/or apps;
These X509 client certificates already have user and group information inside, such as, when generating a certificate signing request (CSR) with
openssl:# For the username "jbeda", belonging to two groups, "app1" and "app2". $ openssl req -new -key jbeda.pem -out jbeda-csr.pem -subj "/CN=jbeda/O=app1/O=app2"CN(common name): user name for the request.O(organization): user’s group memberships. To include multiple group memberships for a user, include multiple organization fields in the certificate.
- Client: carry the certificate in TLS fields when sending a request;
- Server (
kube-apiserver): verify the client certificate against the root CAs. If a client certificate is presented and verified, extract information.
2.6.3 Support ServiceAccount (for in-cluster apps, mainly)
The above two strategies need a (human) administrator to generate and
distribute client credentials, which apparently isn’t friendly to the native
applications deployed in a Kubernetes cluster. For the latter scenario, there
should be an automatic way. That’s why we introduced ServiceAccount abstration.
For the implementation,
- It also uses signed bearer tokens to verify requests;
-
Still use X509 certificates, but can be configured with an independent CAs to differentiate from external users/apps;
--service-account-key-file=<sa-key.pem>: a file containing a PEM encoded key for signing bearer tokens. If unspecified, usekube-apiserver’s TLS private key.

Fig 3-3. Support X509 AuthN strategy
The client certificate will be signed by the control plane automatically, and be mounted to the related pods at well-known locations by a control plane component (ServiceAccount Admission Controller).
Workflow: 1 -> 2 -> 3b -> 4b -> 5.
Service account bearer tokens is mainly meant to be used for in-cluster apps, but they are perfectly valid to use outside the cluster and can be used to create identities for long standing jobs that wish to talk to the Kubernetes API.
And regarding to user information assiciation,
service accounts authenticate with the username system:serviceaccount:<ns>:<sa>,
and are assigned to the groups system:serviceaccounts and system:serviceaccounts:<ns>.
2.6.4 Support anonymous user
This is easy, as long as we give a dedicated user/group association to the annonymous user so later AuthZ module can work correctly:
- User:
system:anonymous - Group:
system:unauthenticated
2.6.5 Chain up
In the similar way, we could support other types of AuthN strategies like
OpenID Connect (OIDC), request header (X-Remote-xxx).
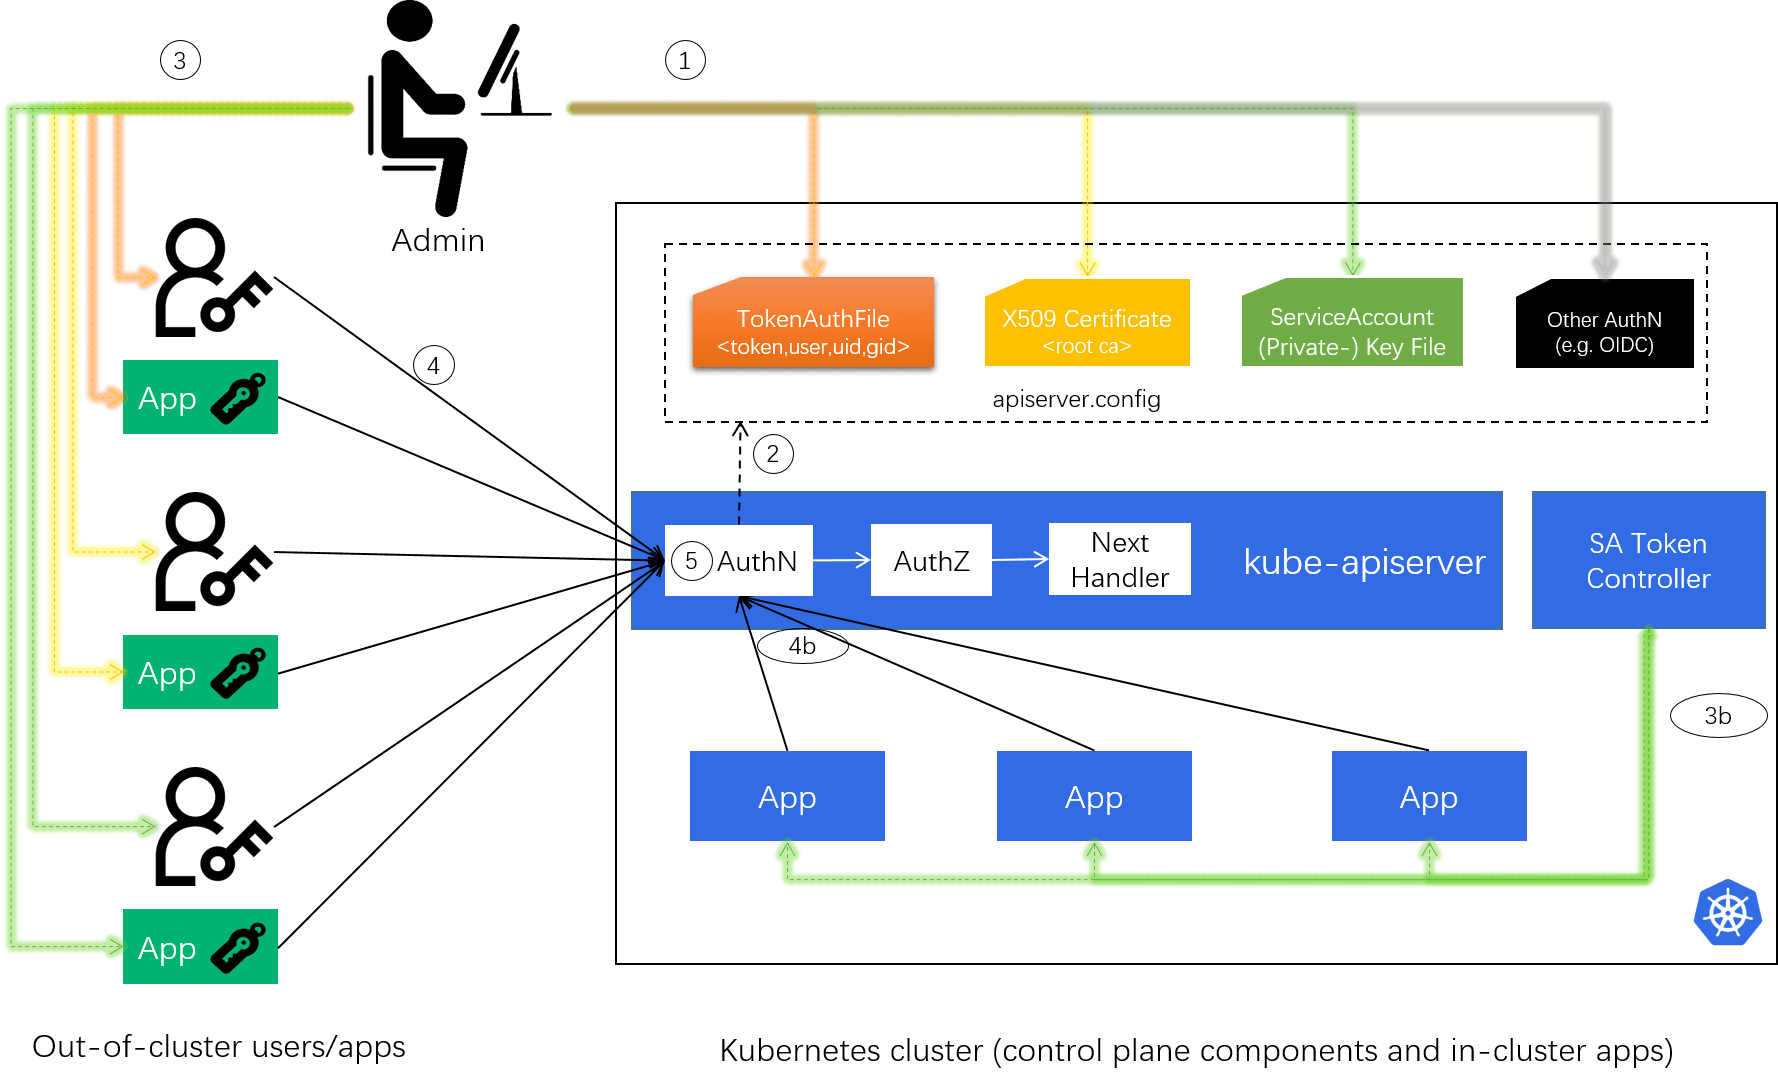
With all these strategies, the final architecture and workflow of our solution
will look like this:
Fig 3-4. Workflow of the designed AuthN solution
And the psudo-code when kube-apiserver authenticates a request:
func AuthN(nextHandler, req) {
    for h in authenticator.handlers {
        if resp, ok := h.AuthenticateRequest(req); ok {
           req.Header.Del("Authorization")  // not required anymore in case of a successful authentication.
           req = req.Context.Add(resp.User) // put user info into context

           nextHandler.ServeHTTP(w, req)    // go to the next handler (e.g. AuthZ)
           return
        }
    }

    if allowAnonymousAccess {
        req.Header.Del("Authorization")
        req = req.Context.Add("system:anonymous")
        nextHandler.ServeHTTP(w, req)    // go to the next handler (e.g. AuthZ)
        return
    }

    // Some error handling, then return 401
    return "401 Unauthorized"
}
With no surprises that this hand made solution is just a simplified version of the one shipped in Kubernetes.
3 Implementation
If you would like to have some hands-on tests right now, you can skip this section and go to setion 4 directly.
And, without making this post too long, we
just give some implementation descriptions of the vanilla Kubernetes AuthN.
Code based on Kubernetes v1.23.
3.1 kube-apiserver AuthN options registration
// https://github.com/kubernetes/kubernetes/blob/v1.23.1/pkg/kubeapiserver/options/authentication.go#L48

// All build-in authentication options for API Server
type BuiltInAuthenticationOptions struct {
    APIAudiences    []string
    Anonymous       *AnonymousAuthenticationOptions
    BootstrapToken  *BootstrapTokenAuthenticationOptions
    ClientCert      *genericoptions.ClientCertAuthenticationOptions
    OIDC            *OIDCAuthenticationOptions
    RequestHeader   *genericoptions.RequestHeaderAuthenticationOptions
    ServiceAccounts *ServiceAccountAuthenticationOptions
    TokenFile       *TokenFileAuthenticationOptions
    WebHook         *WebHookAuthenticationOptions

    TokenSuccessCacheTTL time.Duration
    TokenFailureCacheTTL time.Duration
}

// WithAll set default value for every build-in authentication option
func (o *BuiltInAuthenticationOptions) WithAll() *BuiltInAuthenticationOptions {
    return o.
        WithAnonymous().
        WithBootstrapToken().
        WithClientCert().
        WithOIDC().
        WithRequestHeader().
        WithServiceAccounts().
        WithTokenFile().
        WithWebHook()
}

// AddFlags returns flags of authentication for a API Server
func (o *BuiltInAuthenticationOptions) AddFlags(fs *pflag.FlagSet) {
    // register options, e.g. --token-auth-file
}
3.2 Kubernetes authenticator chain
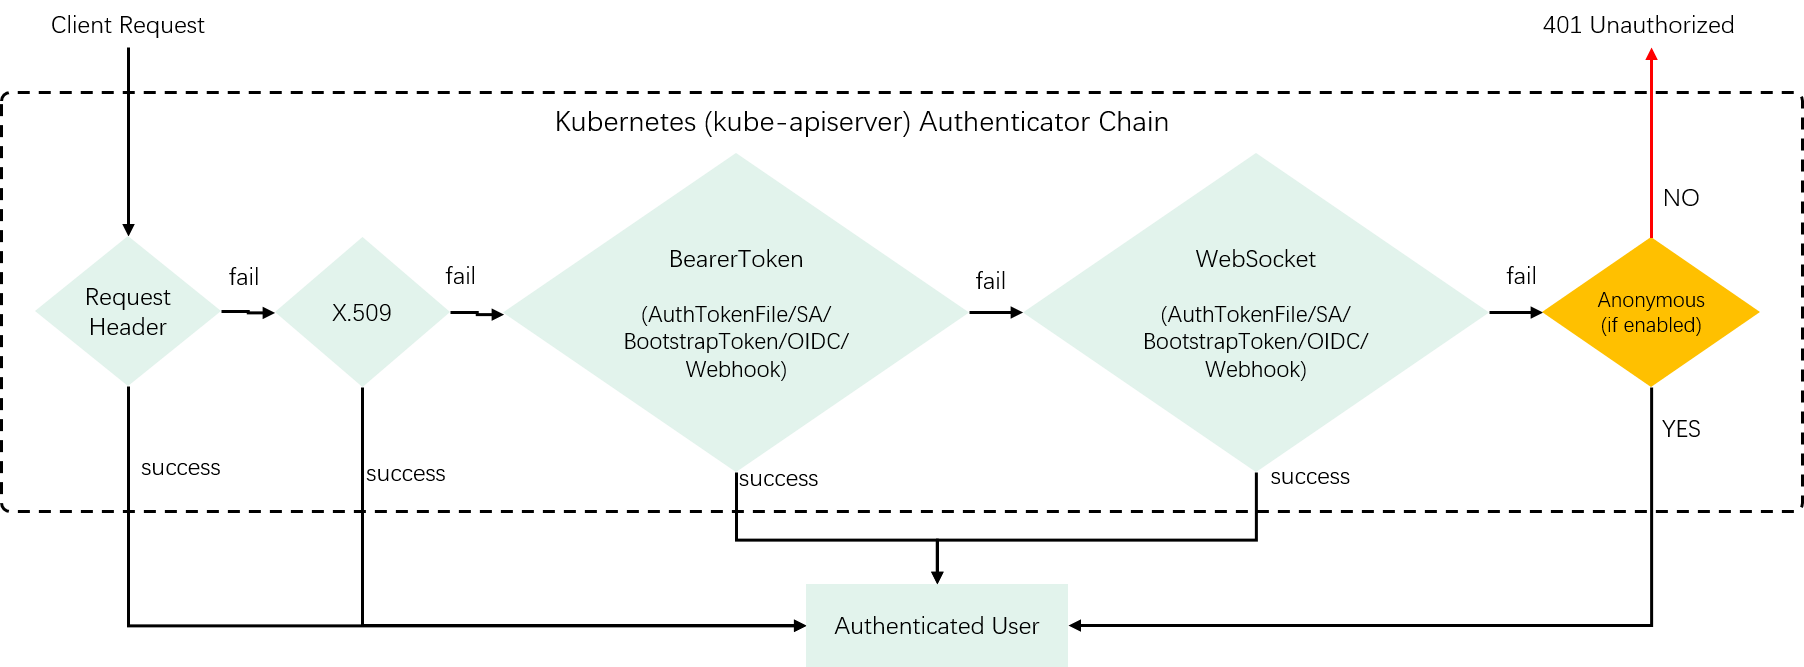
Fig 1-1.
As illustrated above, Kubernetes implements more AuthN strategies than our toy solution does,
- Support request header authentication (e.g.
X-Remote-User,X-Remote-Groupheaders) - Group all kinds of bearer token methods into a general one
But essentially, it’s similar as our toy design. Some code:
// New returns an authenticator.Request or an error that supports the standard
// Kubernetes authentication mechanisms.
Config.New() // https://github.com/kubernetes/kubernetes/blob/v1.23.1/pkg/kubeapiserver/authenticator/config.go#L94
 |
 |// Request header method
 |-if config.RequestHeaderConfig
 |   requestHeaderAuthenticator := headerrequest.NewDynamicVerifyOptionsSecure()
 |   authenticators.append(requestHeaderAuthenticator)
 |
 |// X509 methods
 |-if config.ClientCAContentProvider
 |   certAuth := x509.NewDynamic()
 |   authenticators.append(certAuth)
 |
 |// ================= Bearer token methods starts ===========================
 | // Token Auth File
 |-if config.TokenAuthFile // --token-auth-file
 |      tokenAuth := newAuthenticatorFromTokenFile(config.TokenAuthFile)
 |      tokenAuthenticators.append(tokenAuth)
 |
 | // ServiceAccount key files
 |-if config.ServiceAccountKeyFiles // --service-account-key-file
 |     serviceAccountAuth := newLegacyServiceAccountAuthenticator(config.ServiceAccountKeyFiles)
 |     tokenAuthenticators.append(serviceAccountAuth)
 |
 | // ServiceAccount issuers
 |-if config.ServiceAccountIssuers  // --service-account-issuers
 |     serviceAccountAuth := newServiceAccountAuthenticator(config.ServiceAccountIssuers, config.ServiceAccountKeyFiles)
 |     tokenAuthenticators.append(serviceAccountAuth)
 |
 | // Bootstrap tokens
 |-if config.BootstrapToken
 |     tokenAuthenticators.append(config.BootstrapTokenAuthenticator)
 |
 | // OIDC
 |-if config.OIDC
 |     tokenAuthenticators.append(oidcAuth)
 |
 | // Webhok token auth confi file
 |-if config.WebhookTokenAuthnConfigFile
 |     webhookTokenAuth := newWebhookTokenAuthenticator(config)
 |     tokenAuthenticators.append(webhookTokenAuth)
 |
 |-if len(tokenAuthenticators) > 0
 |     tokenAuth := tokenunion.New(tokenAuthenticators...) // Union the token authenticators (and cache it optionally)
 |     authenticators.append(bearertoken.New(tokenAuth),   // general bearertoken wrapper
 |         websocket.NewProtocolAuthenticator(tokenAuth))  //
 |     securityDefinitions["BearerToken"] = &spec.SecurityScheme{
 |             Type:        "apiKey",
 |             Name:        "authorization",
 |             In:          "header",
 |             Description: "Bearer Token authentication",
 |     }
 |// ================= Bearer token methods ends ===========================
 |
 |  authenticator := union.New(authenticators...)
 |  authenticator = group.NewAuthenticatedGroupAdder(authenticator)
 |
 |-if config.Anonymous
        authenticator.append(anonymous.NewAuthenticator)
3.3 Authenticate a request
When a request arrives,
WithAuthentication() will be invokded, which tries to authenticate the given
request as a user, and then stores user information to the request’s context.
On success, “Authorization” header is removed from the request and the next handler
is invoked to serve the request:
// https://github.com/kubernetes/kubernetes/blob/v1.23.0/staging/src/k8s.io/apiserver/pkg/endpoints/filters/authentication.go#L41

func WithAuthentication(handler http.Handler, auth authenticator.Request) http.Handler {
    return withAuthentication(handler, auth, failed, apiAuds, recordAuthMetrics)
}

func withAuthentication(handler http.Handler, auth authenticator.Request, ...) http.Handler {
    return http.HandlerFunc(func(w http.ResponseWriter, req *http.Request) {
        resp, ok := auth.AuthenticateRequest(req) // iterate over the authenticator list, return ok if anyone succeeds
        if !ok {
            failed.ServeHTTP()
            return
        }

        req.Header.Del("Authorization") // not required anymore in case of a successful authentication.
        req.Context.Add(resp.User)

        handler.ServeHTTP(w, req)
    })
}
auth.AuthenticateRequest(req) will iterate over the registered authenticator list, and
return ok if anyone succeeds.
// https://github.com/kubernetes/kubernetes/blob/v1.23.1/staging/src/k8s.io/apiserver/pkg/authentication/request/union/union.go#L53

// unionAuthRequestHandler authenticates requests using a chain of authenticator.Requests
type unionAuthRequestHandler struct {
    Handlers []authenticator.Request
    FailOnError bool // determines whether an error returns short-circuits the chain
}

// Authenticate the request using a chain of authenticator.Request objects.
func (authHandler *unionAuthRequestHandler) AuthenticateRequest(req *http.Request) (*authenticator.Response, bool, error) {
    for _, h := range authHandler.Handlers {
        resp, ok, err := h.AuthenticateRequest(req)
        if ok {
            return resp, ok, err
        }
    }

    return nil, false, utilerrors.NewAggregate(errlist)
}
Let’s see two specific authenticator.
3.3.1 Static token authentication
Static token authenticator, along with many other token based authenticators, is wrapped by a general bearer token authenticator in the implementation:
// https://github.com/kubernetes/kubernetes/blob/v1.23.1/staging/src/k8s.io/apiserver/pkg/authentication/request/bearertoken/bearertoken.go#L37
func (a *Authenticator) AuthenticateRequest(req *http.Request) (*authenticator.Response, bool, error) {
    auth := strings.TrimSpace(req.Header.Get("Authorization"))
    parts := strings.SplitN(auth, " ", 3)
    token := parts[1]

    resp, ok, err := a.auth.AuthenticateToken(req.Context(), token)
    if ok {
        req.Header.Del("Authorization")
    }

    // If the token authenticator didn't error, provide a default error
    if !ok && err == nil {
        err = invalidToken
    }

    return resp, ok, err
}
a.auth.AuthenticateRequest() will further delegate to the real static token authenticator:
// https://github.com/kubernetes/kubernetes/blob/v1.23.1/staging/src/k8s.io/apiserver/pkg/authentication/authenticator/interfaces.go#L28
type Token interface {
    AuthenticateToken(ctx context.Context, token string) (*Response, bool, error)
}

// https://github.com/kubernetes/kubernetes/blob/v1.23.1/staging/src/k8s.io/apiserver/pkg/authentication/token/tokenfile/tokenfile.go#L93
func (a *TokenAuthenticator) AuthenticateToken(ctx context.Context, value string) (*authenticator.Response, bool, error) {
    user, ok := a.tokens[value]
    if !ok {
        return nil, false, nil
    }

    return &authenticator.Response{User: user}, true, nil // User: type user.Info
}
Where the User information of the token is retrieved:
// https://github.com/kubernetes/kubernetes/blob/v1.23.1/staging/src/k8s.io/apiserver/pkg/authentication/user/user.go#L20

// Info describes a user that has been authenticated to the system.
type Info interface {
    GetName() string
    GetUID() string
    GetGroups() []string
    GetExtra() map[string][]string
}
Token file authenticator reads a <token,user,userid> 3-tuple CSV file when kube-apiserver starts,
and stores this information in the memory.
// NewCSV returns a TokenAuthenticator, populated from a CSV file.
// The CSV file must contain records in the format "token,username,useruid"
func NewCSV(path string) (*TokenAuthenticator, error) {
    ...
}
So here it just check if the given token is in the
token list, if is, extract the user field and put into the response (so later on the outer authenticator can put
it into the request’s context for subsequent AuthZ usage).
3.3.2 X509 authenticator
// https://github.com/kubernetes/kubernetes/blob/v1.23.0/staging/src/k8s.io/apiserver/pkg/authentication/request/x509/x509.go#L198

func (a *Verifier) AuthenticateRequest(req *http.Request) (*authenticator.Response, bool, error) {
    ...
    req.TLS.PeerCertificates[0].Verify();
    verifySubject(req.TLS.PeerCertificates[0].Subject)

    return a.auth.AuthenticateRequest(req)
}

func (a *Authenticator) AuthenticateRequest(req *http.Request) (*authenticator.Response, bool, error) {
    req.TLS.PeerCertificates[0].NotAfter.Sub(time.Now())

    chains := req.TLS.PeerCertificates[0].Verify()
    for _, chain := range chains {
        user, ok := a.user.User(chain)
        if ok {
            return user, ok, err
        }
    }

    return err
}
3.4 ServiceAccount and Secret
// https://github.com/kubernetes/kubernetes/blob/v1.23.1/staging/src/k8s.io/api/core/v1/types.go#L4600

// ServiceAccount binds together:
// * a name, understood by users, and perhaps by peripheral systems, for an identity
// * a principal that can be authenticated and authorized
// * a set of secrets
type ServiceAccount struct {
    metav1.TypeMeta
    metav1.ObjectMeta

    // list of secrets allowed to be used by pods running using this ServiceAccount.
    // More info: https://kubernetes.io/docs/concepts/configuration/secret
    Secrets []ObjectReference

    ImagePullSecrets []LocalObjectReference

    // whether pods running as this service account should have an API token automatically mounted.
    AutomountServiceAccountToken *bool
}
// https://github.com/kubernetes/kubernetes/blob/v1.23.1/staging/src/k8s.io/api/core/v1/types.go#L6005

// Secret holds secret data of a certain type. The total bytes of the values in
// the Data field must be less than MaxSecretSize bytes.
type Secret struct {
    metav1.TypeMeta
    metav1.ObjectMeta

    Immutable *bool

    Data map[string][]byte // secret data, base64 encoded

    // stringData allows specifying non-binary secret data in string form.
    // It is provided as a write-only input field for convenience.
    StringData map[string]string

    // Used to facilitate programmatic handling of secret data.
    // More info: https://kubernetes.io/docs/concepts/configuration/secret/#secret-types
    Type SecretType
}
Token controller:
// https://github.com/kubernetes/kubernetes/blob/v1.23.1/pkg/controller/serviceaccount/tokens_controller.go#L134

// TokensController manages ServiceAccountToken secrets for ServiceAccount objects
type TokensController struct {
   ...
}
4 Tests with the Kubernetes AuthN
In this section, let’s see how to use the various AuthN strategies with command
line tools like curl and programming (golang).
Examples here will be simple enough, but it will reveal the workflows and implementation details
we’ve covered in the previous section.
4.1 Preparations
First of all, you should have a running Kubernetes cluster at hand, e.g. with minikube, but this is out of this post’s scope.
Make sure the AuthN module works as expected by requesting kube-apiserver with
a fake token:
$ export API_SERVER_URL=<addr> # e.g. https://127.0.0.1:6443

$ curl -k -H "Authorization: Bearer 1234" $API_SERVER_URL/api/v1/namespaces/default/pods
{
  ...
  "message": "Unauthorized",
  "code": 401
}
Received a “401 Unauthorized” response, and met expectation.
4.1 Static token
This section describes how to access Kubernetes API from outside the cluster with static token AuthN strategy.
4.1.1 Prepare token file
Prepare a static token authentication file:
$ cat /etc/kubernetes/static-tokens.csv
alice-rand1,alice,111,666 # <token>,<user>,<uid>,<gid>, where uid/gid are arbitrary strings
bob-rand2,bob,222,666
cindy-rand3,cindy,333,777
where there are three tokens each for a user, and user alice
and bob belongs to the same user group 666.
4.1.2 Configure kube-apiserver
Configure kube-apiserver with --token-auth-file=/etc/kubernetes/static-tokens.csv and restart it,
e.g. if your cluster is deployed with binaries:
$ systemctl daemon-reload
$ systemctl restart kube-apiserver
4.1.3 Command line example with curl
Verify AuthN OK (but AuthZ will fail)
Now test again:
$ curl -k -H "Authorization: Bearer alice-rand1" $API_SERVER_URL/api/v1/namespaces/default/pods
{
  ...
  "message": "pods is forbidden: User \"alice\" cannot list resource \"pods\" in API group \"\" in the namespace \"default\"",
  "reason": "Forbidden",
  "code": 403
}
Well, still failed, but notice that the response now is 403 Forbidden instead
of the previous 401 Unauthorized, which indicates that we have been
successfully authenticated, and the request failed only because user
alice doesn't have enough permissions to perform the
operation - which is denied by AuthZ.
Add Role and RoleBinding to pass AuthZ
As a quick remedy, we can create a role which has the proper permissions, and then bind users to this role [6].
The role specification role-pod-reader.yaml:
apiVersion: rbac.authorization.k8s.io/v1
kind: Role
metadata:
  namespace: default
  name: pod-reader
rules:
- apiGroups: [""] # "" indicates the core API group
  resources: ["pods"]
  verbs: ["get", "list"]
The role binding specification
rolebinding-for-alice.yaml:
apiVersion: rbac.authorization.k8s.io/v1
kind: RoleBinding
metadata:
  name: read-pods
  namespace: default
subjects:
- kind: User
  name: alice # "name" is case sensitive
  apiGroup: rbac.authorization.k8s.io
roleRef:
  kind: Role
  name: pod-reader
  apiGroup: rbac.authorization.k8s.io
Now create them:
$ k apply -f role-pod-reader.yaml
$ k apply -f rolebinding-for-alice.yaml
Then test again:
$ curl -k -H "Authorization: Bearer alice-rand1" $API_SERVER_URL/api/v1/namespaces/default/pods
{
  "kind": "PodList",
  "apiVersion": "v1",
  "items": [ ... ]
}
OK, we successfully got the response we wanted!
And we can double confirm that the other two users will still encounter 403 as they are not binded to the role (for brevity, we’ll just print the status code):
$ curl -s -k -H "Authorization: Bearer bob-rand2" $API_SERVER_URL/api/v1/namespaces/default/pods | jq '.code'
403

$ curl -s -k -H "Authorization: Bearer cindy-rand3" $API_SERVER_URL/api/v1/namespaces/default/pods | jq '.code'
403
Test finished, now delete the role binding (but keep the role
for subsequent tests, so do not perform k delete -f role-pod-reader.yaml):
$ k delete -f rolebinding-for-alice.yaml
As another test, let bind user group 666 to pod-reader role, so both alice and bob
can access the resource.
The role binding specification rolebinding-for-group.yaml:
apiVersion: rbac.authorization.k8s.io/v1
kind: RoleBinding
metadata:
  name: read-pods
  namespace: default
subjects:
- kind: Group
  name: "666"
  apiGroup: rbac.authorization.k8s.io
roleRef:
  kind: Role
  name: pod-reader
  apiGroup: rbac.authorization.k8s.io
Apply it:
$ k apply -f rolebinding-for-group.yaml
And test again:
$ curl -k -H "Authorization: Bearer alice-rand1" $API_SERVER_URL/api/v1/namespaces/default/pods
{
  "kind": "PodList",
  "apiVersion": "v1",
  "items": [ ... ]
}

$ curl -k -H "Authorization: Bearer bob-rand2" $API_SERVER_URL/api/v1/namespaces/default/pods
{
  "kind": "PodList",
  "apiVersion": "v1",
  "items": [ ... ]
}

# cindy will still get 403 as she is not in the "666" user group
$ curl -s -k -H "Authorization: Bearer cindy-rand3" $API_SERVER_URL/api/v1/namespaces/default/pods | jq '.code'
403
Just as expected!
4.1.4 Programming example with golang
package main

import (
	"crypto/tls"
	"fmt"
	"io/ioutil"
	"net/http"
)

func main() {
	// Ignore TLS verification (irrelevant to our case) for simple tests
	transport := &http.Transport{TLSClientConfig: &tls.Config{InsecureSkipVerify: true}}
	client := &http.Client{Transport: transport}

	url := "https://127.0.0.1:6443/api/v1/namespaces/default/pods"
	userToken := "alice-rand1"

	req, err := http.NewRequest("GET", url, nil)
	req.Header.Add("Authorization", "Bearer "+userToken)

	resp, err := client.Do(req)
	if err != nil {
		fmt.Println("HTTP request failed: ", err)
	}
	defer resp.Body.Close()

	if body, err := ioutil.ReadAll(resp.Body); err != nil {
		fmt.Println("Error while reading response:", err)
	} else {
		fmt.Println(string([]byte(body)))
	}
}
With proper role binding configured (otherwise will get 401/403 responses as above):
$ go run static-token-client.go
{"kind":"PodList","apiVersion":"v1","items":[...]}
4.2 X509 certificate
4.2.1 Prepare root CA
Check if your kube-apiserver already has --client-ca-file=xx configured, if not, you should generate
CA files with commands in this section.
Commands adapted from Provisioning a CA and Generating TLS Certificates.
$ cat > ca-config.json <<EOF
{
  "signing": {
    "default": {
      "expiry": "8760h"
    },
    "profiles": {
      "kubernetes": {
        "usages": ["signing", "key encipherment", "server auth", "client auth"],
        "expiry": "8760h"
      }
    }
  }
}
EOF

$ cat > ca-csr.json <<EOF
{
  "CN": "Kubernetes",
  "key": {
    "algo": "rsa",
    "size": 2048
  },
  "names": [
    {
      "C": "US",
      "L": "Portland",
      "O": "Kubernetes",
      "OU": "CA",
      "ST": "Oregon"
    }
  ]
}
EOF

$ cfssl gencert -initca ca-csr.json | cfssljson -bare ca
The result will be:
ca.pem: CA certificateca-key.pem: CA private key
4.2.2 Configure kube-apiserver
Start kube-apiserver with --client-ca-file=/var/lib/kubernetes/ca.pem and restart it.
4.2.3 Issue an X509 client certificate for user
Suppose we’d like to issue a certificate for user dylan:
$ cat dylan-csr.json
{
  "CN": "dylan",
  "key": {
    "algo": "rsa",
    "size": 2048
  },
  "names": [
    {
      "C": "US",
      "L": "Portland",
      "O": "usergroup1",
      "OU": "Cracking Kubernetes AuthN Model",
      "ST": "Oregon"
    }
  ]
}
For our simple test case, we just need to take care the following fields:
"CN": username"O": user group (organization)
Now generate the certificate:
$ cfssl gencert -ca=ca.pem -ca-key=ca-key.pem -config=ca-config.json -profile=kubernetes dylan-csr.json | cfssljson -bare dylan
[INFO] generate received request
[INFO] received CSR
[INFO] generating key: rsa-2048
[INFO] encoded CSR
[INFO] signed certificate with serial number 14406...

$ ls dylan*.pem
dylan-key.pem  dylan.pem # <-- private key and certificate
4.2.4 Command line example with curl
$ curl --key dylan-key.pem --cert dylan.pem --cacert ca.pem $API_SERVER_URL/api/v1/namespaces/default/pods
{
  ...
  "message": "pods is forbidden: User \"dylan\" cannot list resource \"pods\" in API group \"\" in the namespace \"default\"",
  "reason": "Forbidden",
  "code": 403
}
Just as expected, 403 and the message indicate that dylan have successfully been
authenticated, but is not allowed to access the API as we haven’t been granted the permission via AuthZ.
Now create a role binding for dylan:
apiVersion: rbac.authorization.k8s.io/v1
kind: RoleBinding
metadata:
  name: read-pods
  namespace: default
subjects:
- kind: User
  name: dylan
  apiGroup: rbac.authorization.k8s.io
roleRef:
  kind: Role
  name: pod-reader
  apiGroup: rbac.authorization.k8s.io
$ k apply -f rolebinding-for-dylan.yaml
rolebinding.rbac.authorization.k8s.io/read-pods configured
Test again:
$ curl --key dylan-key.pem --cert dylan.pem --cacert ca.pem $API_SERVER_URL/api/v1/namespaces/default/pods
{
  "kind": "PodList",
  "apiVersion": "v1",
  "items": [ ... ]
}
Successful!
4.2.5 Programming example with golang
Code snippet adapted from michaljemala/tls-client.go:
package main

import (
	"crypto/tls"
	"crypto/x509"
	"flag"
	"io/ioutil"
	"log"
	"net/http"
)

var (
	certFile = flag.String("cert", "someCertFile", "A PEM eoncoded certificate file.")
	keyFile  = flag.String("key", "someKeyFile", "A PEM encoded private key file.")
	caFile   = flag.String("CA", "someCertCAFile", "A PEM eoncoded CA's certificate file.")
)

func main() {
	flag.Parse()

	// Load client cert
	cert, err := tls.LoadX509KeyPair(*certFile, *keyFile)
	if err != nil {
		log.Fatal(err)
	}

	// Load CA cert
	caCert, err := ioutil.ReadFile(*caFile)
	if err != nil {
		log.Fatal(err)
	}
	caCertPool := x509.NewCertPool()
	caCertPool.AppendCertsFromPEM(caCert)

	// Setup HTTPS client
	tlsConfig := &tls.Config{
		Certificates: []tls.Certificate{cert},
		RootCAs:      caCertPool,
	}
	tlsConfig.BuildNameToCertificate()
	transport := &http.Transport{TLSClientConfig: tlsConfig}
	client := &http.Client{Transport: transport}

	// Do GET something
	resp, err := client.Get("https://127.0.0.1:6443/api/v1/namespaces/default/pods")
	if err != nil {
		log.Fatal(err)
	}
	defer resp.Body.Close()

	// Dump response
	data, err := ioutil.ReadAll(resp.Body)
	if err != nil {
		log.Fatal(err)
	}
	log.Println(string(data))
}
With proper role binding configured:
$ go run x509-client.go -cert dylan.pem -key dylan-key.pem -CA ca.pem
{"kind":"PodList","apiVersion":"v1","items":[...]}
4.3 ServiceAccount
For < v1.24.0, a secret/token is automatically created for each serviceaccount:
$ k create sa my-sa
serviceaccount/my-sa created

$ k get sa
NAME      SECRETS   AGE
my-sa     1         2s  # <-- A secret is created for this SA

$ k get sa my-sa -o yaml
apiVersion: v1
kind: ServiceAccount
metadata:
  creationTimestamp: "2022-06-08T12:59:15Z"
  name: my-sa
  namespace: default
  resourceVersion: "7682925"
  uid: a0a2738e-5ad8-4f07-8588-10c82caac02e
secrets:
- name: my-sa-token-5dx8g # <-- A secret is created for this SA

$ k get secrets my-sa-token-5dx8g -o yaml
apiVersion: v1
data:
  ca.crt: LS0tLS1CRUdJTiBDRVJUSUZJQ0FUR...FURS0tLS0tCg==
  namespace: ZGVmYXVsdA==
  token: ZXlKaGJHY2lPaUpT...UnYxbm9wbjAtUQ==               # <--- The token in the secret
kind: Secret
type: kubernetes.io/service-account-token

$ k get secrets my-sa-token-5dx8g -o jsonpath='{.data.token}' | base64 -d
eyJhb...ZYT-VTp-v-rx8Rv1nopn0-Q
Put this token into the Authorization: Bearer {token} and send the request.
Or, you could also use a kubeconfig + token file, such as to configure Cilium:
$ cilium-agent --k8s-kubeconfig-path=/etc/cilium/cilium.kubeconfig ...
where,
$ cat /etc/cilium/cilium.kubeconfig
apiVersion: v1
clusters:
- cluster:
    certificate-authority: /etc/cilium/ca.crt
    server: https://<addr>:443
  name: default-cluster
contexts:
- context:
    cluster: default-cluster
    user: default-user
  name: default-context
current-context: default-context
kind: Config
preferences: {}
users:
- name: default-user
  user:
    tokenFile: /etc/cilium/cilium.token

$ cat /etc/cilium/cilium.token
eyJhbG...xuOMjQ
An excellent example has been provided in Implementing a custom Kubernetes authentication method [4].
For >= v1.24.0:
$ k create sa my-sa
serviceaccount/my-sa created

$ k get sa
NAME      SECRETS   AGE
my-sa     0         2s    # <-- No secrets created for this SA

$ k get sa my-sa -o yaml
apiVersion: v1
kind: ServiceAccount
metadata:
  creationTimestamp: "2022-06-08T13:48:02Z"
  name: my-sa
  namespace: default
  resourceVersion: "7686160"
  uid: baa8efd9-6219-46d3-9efd-87d6509dfd32

$ k create token my-sa   # Create a token for serviceaccount 'my-sa' by our own
eyJhbGciO...yJbkfZQJt7Q  # Note that this token is not base64 encoded
4.4 LDAP or OIDC
An in-depth example has been provided in Implementing a custom Kubernetes authentication method [5].
5 Discussions
Some in-depth disccussions.
5.1 More AuthN strategies
Kubernetes supports the following strategies that we haven’t mentioned or detailed in the previous sections:
-
Request header
Option:
--requestheader-client-ca-file=onkube-apiserver
-
Bootstrap Tokens (v1.18+)
To allow for streamlined bootstrapping for new clusters. These tokens are stored as Secrets in the kube-system namespace, where they can be dynamically managed and created.
Option:
--enable-bootstrap-token-authon thekube-apiserver;--controllers=<others>,tokerncleaneron thekube-controller-manager: enable the TokenCleaner controller.
The authenticator authenticates as
system:bootstrap:<Token ID>. It is included in thesystem:bootstrappersgroup. -
OpenID Connect Tokens
OpenID Connect is a flavor of OAuth2 supported by some OAuth2 providers, e.g. Azure Active Directory (AD), Salesforce, and Google. The protocol’s main extension to OAuth2 is additionally returned a JWT (JSON Web Token) format called ID Token, which includes famous such as a user’s email, signed by the server.
To identify the user, the authenticator uses the
id_token(instead of theaccess_token) as a bearer token.Option:
--oidc-*on kube-apiserver
Use the token:
kubectl --token=eyJhb...x01_yD35-rw get nodes -
Webhook authentication is a hook for verifying bearer tokens.
Option:
--authentication-token-webhook-config-filea file describing how to access the remote webhook service.--authentication-token-webhook-cache-ttlhow long to cache authentication decisions. Defaults to two minutes.--authentication-token-webhook-version=v1e.g.authentication.k8s.io/v1TokenReviewobjects to send/receive information from the webhook.
When a client attempts to authenticate with the
kube-apiserverusing a bearer token, the authentication webhook POSTs a JSON-serialized TokenReview object containing the token to the remote service. -
Option:
--proxy-client-cert-file--proxy-client-key-file
Integrations with other authentication protocols (LDAP, SAML, Kerberos, alternate x509 schemes, etc) can be accomplished using an authenticating proxy or the authentication webhook.
You can enable multiple authentication methods at once. You should use at least two methods:
- Service account tokens for service accounts
- at least one other method for user authentication.
When multiple authenticator modules are enabled, the first module to successfully authenticate the request short-circuits evaluation. The kube-apiserver does not guarantee the order authenticators run in.
The system:authenticated group is included in the list of groups for all authenticated users.
5.2 AuthN, AuthZ and the admission control stage
In fact, there is also an admission control stage in Kubernetes that can be used to verify client requests before persistenting the object to backend storage (etcd):

Fig 6-1. AuthN, AuthZ and admission control when processing a client request [3]
See [3] for more information.
5.3 Manually create ServiceAccount
Service account bearer tokens are perfectly valid to use outside the cluster and for apps that wish to talk to the Kubernetes API.
Commands to manually create and inspect a service account:
$ kubectl create serviceaccount jenkins
serviceaccount "jenkins" created
Check the associated secret:
$ kubectl get serviceaccounts jenkins -o yaml
apiVersion: v1
kind: ServiceAccount
...
secrets:
- name: jenkins-token-1yvwg  # <---- the associated secret
The created secret holds the public CA of the kube-apiserver and a signed JSON Web Token (JWT).
$ kubectl get secret jenkins-token-1yvwg -o yaml
apiVersion: v1
kind: Secret
type: kubernetes.io/service-account-token
data:
  ca.crt: xxx               # <---- APISERVER'S CA BASE64 ENCODED
  namespace: ZGVmYXVsdA==
  token: xxx                # <---- BEARER TOKEN BASE64 ENCODED
...
The signed JWT can be used as a bearer token to authenticate as the given service account. Decode the base64 encoded token into a bearer token:
$ k get secrets jenkins-token-1yvwg -o jsonpath={.data.token} | base64 -d
eyJhbGciOiJSUzI1NiIsImt...MvMzBl37sNzeA8w
See above for how the token is included in a request. Normally
these secrets are mounted into pods for in-cluster access to
kube-apiserver, but can be used from outside the cluster as well.
5.4 Extract user information from client credentials
As HTTP requests are made to the kube-apiserver, plugins attempt to associate the following
attributes with the request [1]:
Username: a string, e.g.kube-admin,jane@example.com.UID: a string, attempts to be more consistent and unique than username.Groups: e.g.system:masters,devops-team.- Extra fields: a map of
string -> string listwhich holds additional information authorizers may find useful.
// https://github.com/kubernetes/kubernetes/blob/v1.23.1/staging/src/k8s.io/apiserver/pkg/authentication/user/user.go#L20

// Info describes a user that has been authenticated to the system.
type Info interface {
    GetName() string
    GetUID() string
    GetGroups() []string
    GetExtra() map[string][]string
}
All values are opaque to the authentication system and only hold significance when interpreted by an authorizer.
5.5 User impersonate
Another topic related to AuthN/AuthZ but hasn’t been discussed is user impersonate [1].
An example of the impersonation headers used when impersonating a user with groups:
Impersonate-User: jane.doe@example.com
Impersonate-Group: developers
Impersonate-Group: admins
An example of the impersonation headers used when impersonating a user with a UID and extra fields:
Impersonate-User: jane.doe@example.com
Impersonate-Extra-dn: cn=jane,ou=engineers,dc=example,dc=com
Impersonate-Extra-acme.com%2Fproject: some-project
Impersonate-Extra-scopes: view
Impersonate-Extra-scopes: development
Impersonate-Uid: 06f6ce97-e2c5-4ab8-7ba5-7654dd08d52b
Using CLI:
$ kubectl drain mynode --as=superman --as-group=system:masters
node/mynode cordoned
node/mynode drained
6 Conclusion
This post digs into the Kubernetes AuthN module, we try to understand it by design one by ourself.
Hope that after reading through this post, readers have had a deeper understanding on how the Kubernetes AuthN module works as well as how to configure, use and manage it properly, either as administrators or developers.
References
- Authentication Overview, Kubernetes Doc
- Authorization Overview, Kubernetes Doc
- Concept/Security: Controlling Access to the Kubernetes API, Kubernetes Doc
- Implementing a custom Kubernetes authentication method, learnk8s.io, 2020
- Implementing a custom Kubernetes authentication method, learnk8s.io, 2020
- Using RBAC Authorization, Kubernetes Doc