Cracking Kubernetes Network Policy
TL; DR
This post digs into the Kubernetes NetworkPolicy model, then designs
a policy enforcer based on the technical requirements and further
implements it with less than 100 lines of eBPF code. Hope
that after reading through this post, readers will get a deeper understanding
on how network policies are enforced in the underlying.
Code and scripts in this post: here.
Related posts:
- Cracking Kubernetes Node Proxy (aka kube-proxy)
- Cracking Kubernetes Network Policy
- Cracking Kubernetes Authentication (AuthN) Model
- Cracking Kubernetes RBAC Authorization (AuthZ) Model
- TL; DR
- 1 Introduction
- 2 Design a dataplane policy enforcer
- 3 Implement the enforcer with eBPF
- 4 Test environment and verification
- 5 Discussions
- 6 Conclusion
- References
1 Introduction
1.1 Access control (NetworkPolicy) in Kubernetes
Kubernetes provides NetworkPolicy to control the L3/L4
traffic flows of applications. An example is depicted as below,
where we would like all pods labeled role=backend (clients)
to access the tcp:6379 of all pods with label role=db (servers),
and all other clients should be denied [1]:
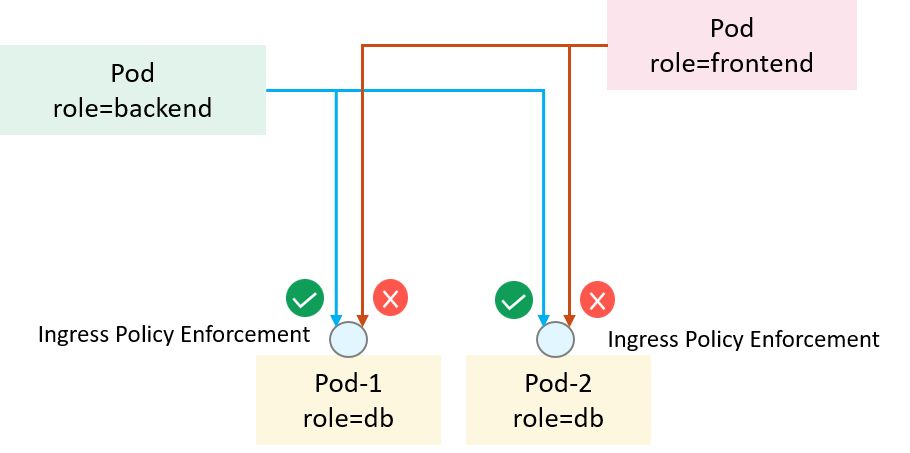
Fig 1-1. Access control in Kubernetes with NetworkPolicy [1]
Below is a minimal NetworkPolicy to achieve the above purpose (assuming
all pods running in default namespace):
apiVersion: networking.k8s.io/v1
kind: NetworkPolicy
metadata:
  name: network-policy-allow-backend
spec:
  podSelector:             # Targets that this NetworkPolicy will be applied on
    matchLabels:
      role: db
  ingress:                 # Apply on targets's ingress traffic
  - from:
    - podSelector:         # Entities that are allowed to access the targets
        matchLabels:
          role: backend
    ports:                 # Allowed proto+port
    - protocol: TCP
      port: 6379
Kubernetes formalizes this user-facing description, but leaves the implementation to each networking solution as an add-on feature, which means that they can choose to support it or not - if the answer is NO, the network policies you created in Kubernetes would just be ignored.
1.2 How policies could be enforced in the underlying?
Networking or security engineers might wonder: if we were responsible for supporting such a feature, how could we enforce the high-level policy specification in the underlying datapath?
The most straight forward way may be hooking and filtering at the network
interface of each Pod. But at the traffic level, all we have are raw packets,
which contain MAC/IP/TCP headers instead of labels (e.g. role=backend),
as illustrated below:
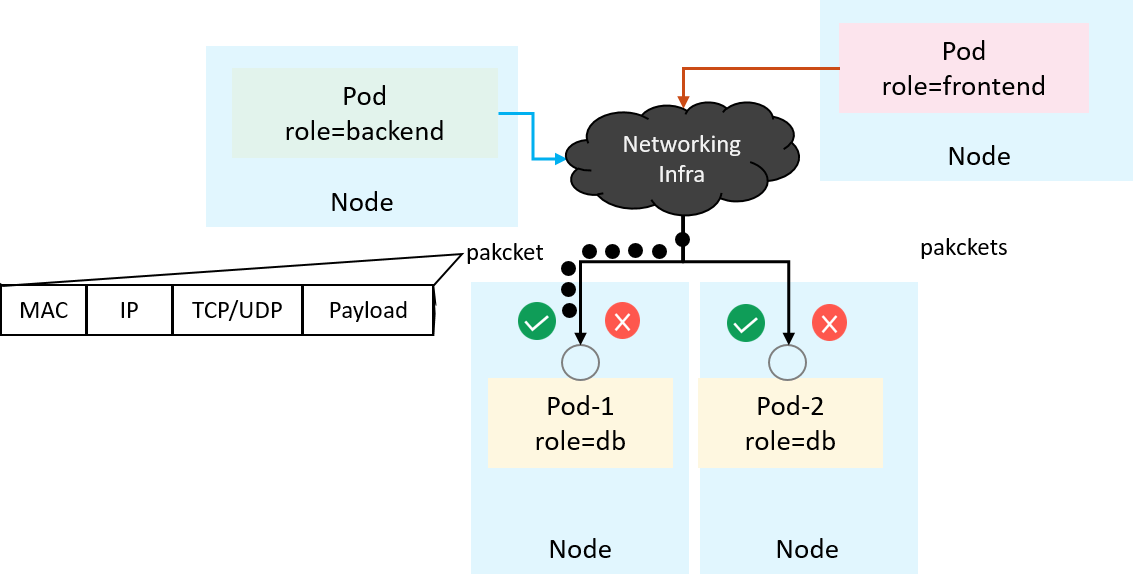
Fig 1-2. A networking and security view of the ingress traffic at Pod's network interface
Embedding labels into each individual packet is possible theoretically, but it’s definitely one of the worst ideas considering efficiency, transparency, performance, operation cost, etc.
In summary of the technical question: how could we verdict (allow/deny) a packet or flow while lacking the ability to directly understand the policies described in a high-level language?
1.3 Purpose of this post
This post answers the question by first analyzing the
technical requirements, then implement a proof-of-concept policy enforcer from
scratch. The toy enforcer is a standalone program, consisting of
less than 100 lines of eBPF code, and could run with
networking solutions that haven’t supported NetworkPolicies yet, such as
flannel.
The remaining of this post is organized as follows:
- Section 2 designs the policy enforcer;
- Section 3 implements it with eBPF;
- Section 4 verifies it;
- Section 5 discusses some important stuffs;
- Section 6 concludes this post.
2 Design a dataplane policy enforcer
We’ll take ingress policy as example in the remaing of this post. Egress is similar.
Now first recap what we have had at hand:
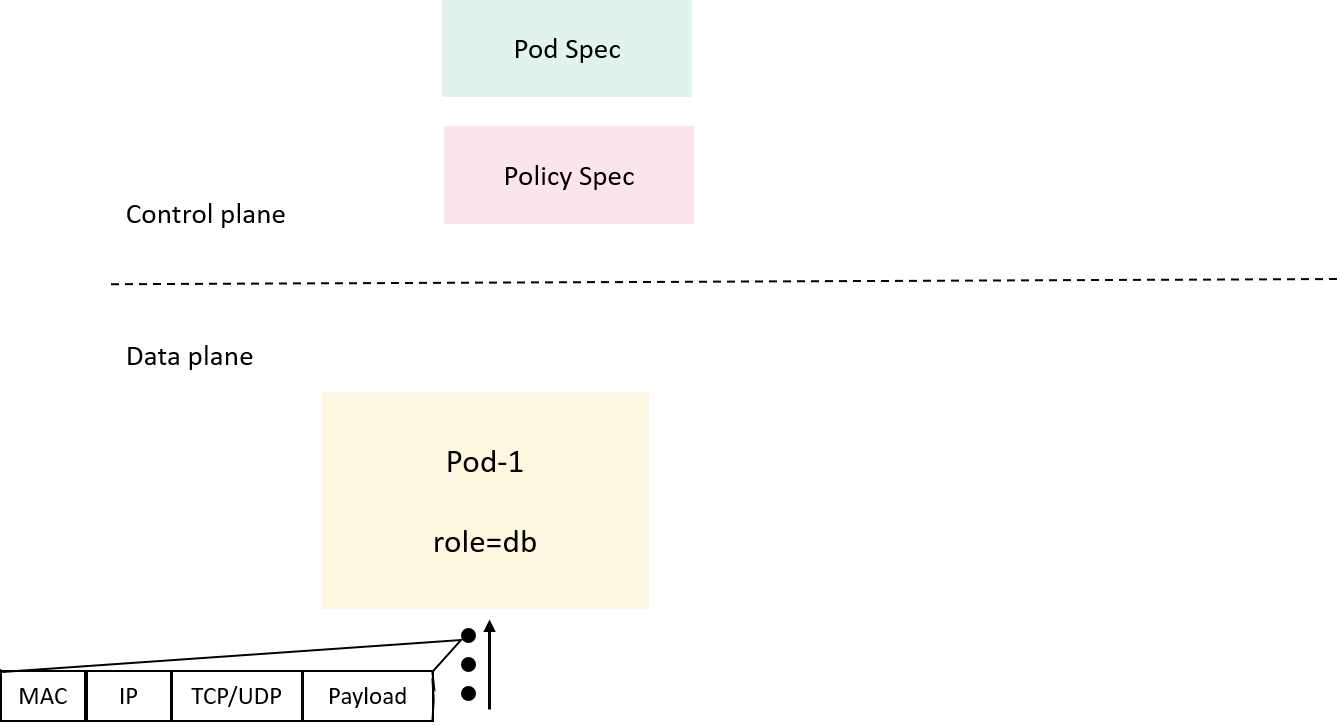
Fig 2-1. What the control/data plane each knows or understands
- In the Kubernetes control plane, we have service, pod and policy
resources described in their
specs (and reflected in theirstatuses), - In the dataplane, all the enforcer can directly see are raw packets;
These two planes speak totally different languages: the former describes resources in high level human-readable formats (e.g. YAML), while the latter is good at handling numerical and arithmetic operations (processing ip addresses, protocol types, ports), so some intermediate stuffs must be introduced to interpret things between them.
Let’s see the first one: service identity.
2.1 Introducing service identity
Selectors like role=frontend are control plane aware metadata, while the policy
enforcer at the dataplane is only good at handling numeric data.
So for the NetworkPolicy to be understood by the dataplane, we need to interpret
the label-based selector into a numeric one.
To be specific, for those pods that can be selected by a specific group
of labels (e.g. role=frontend;namespce=default;), we allocate
a numeric ID (e.g. 10002) for them. So there is a
one-one mapping between the labels and the numeric ID.
The numeric ID acts actually as the “service/application identity”, since all pods of a same service/application share the same identity. For the simple example at the beginning of this post, we’ll have,
Table 2-1. Labels <-> Identity mapping
| Lables | Identity |
role=db;namespace=default; |
10001 |
role=frontend;namespace=default; |
10002 |
role=backend;namespace=default; |
10003 |
Here we only included two labels role=<role>;namespace=<ns> for identity
mapping/allocation, but in reality there be many, such as, one may also would
like to include the serviceaccount=<sa> label.
We also need an algorithm to allocate an identity from given labels, but this is beyond the scope of this post. We just hardcode it and pretend that we already have a proper identity allocation algorithm.
2.2 Introducing identity store: Labels <-> Identity
To store the labels <-> identity metadata, we need an identity store.
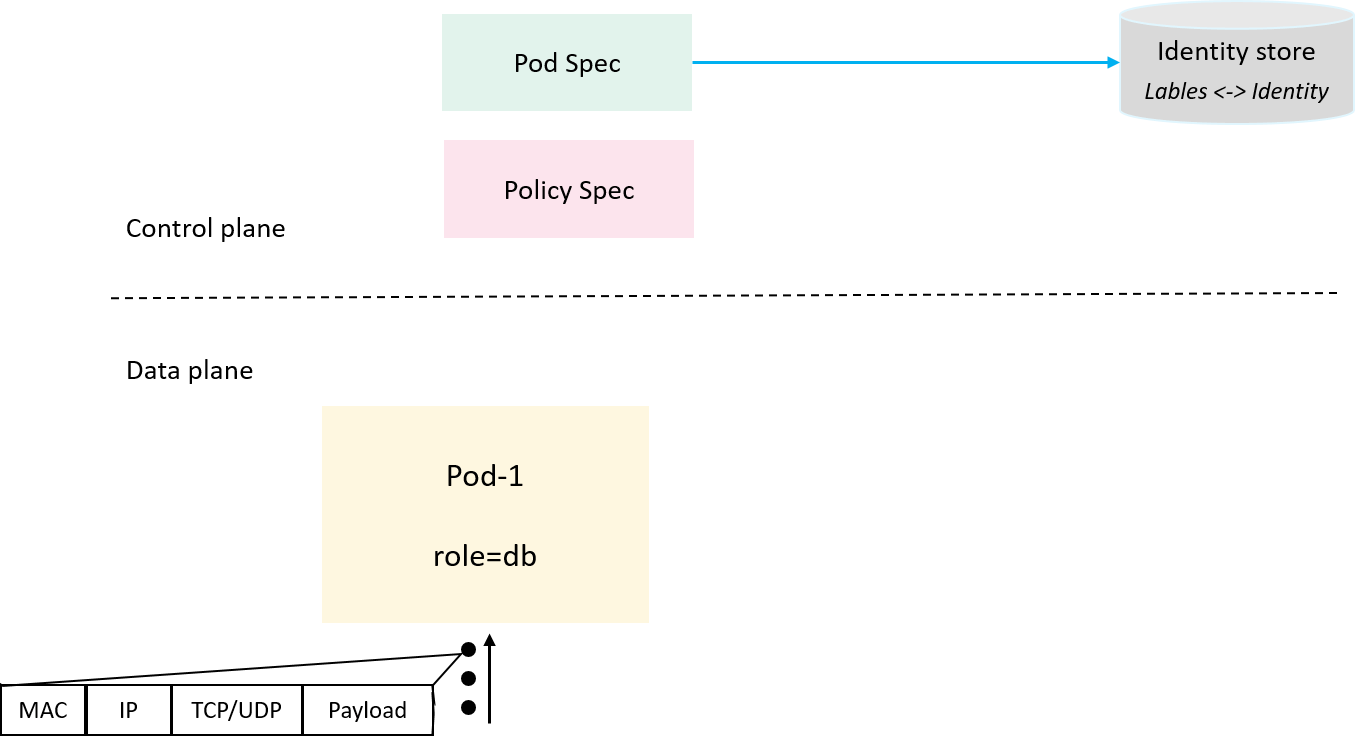
Fig 2-2. Introducing identity and identity store to correlate application/pods to a numeric security identity
In our design it’s just a simple key-value store, with labels we could get
the corresponding identity, and vice verses.
With the structural identities of services turned into numerical identities, we are one step closer to our policy enforcer.
2.3 Introducing policy cache
With the labels <-> identity mapping, we can now transform
the label-based policy spec into a numeric representation that our dataplane
enforcer understands. We also need to save it in a dataplane cache, and we name
it policy cache, as shown below,
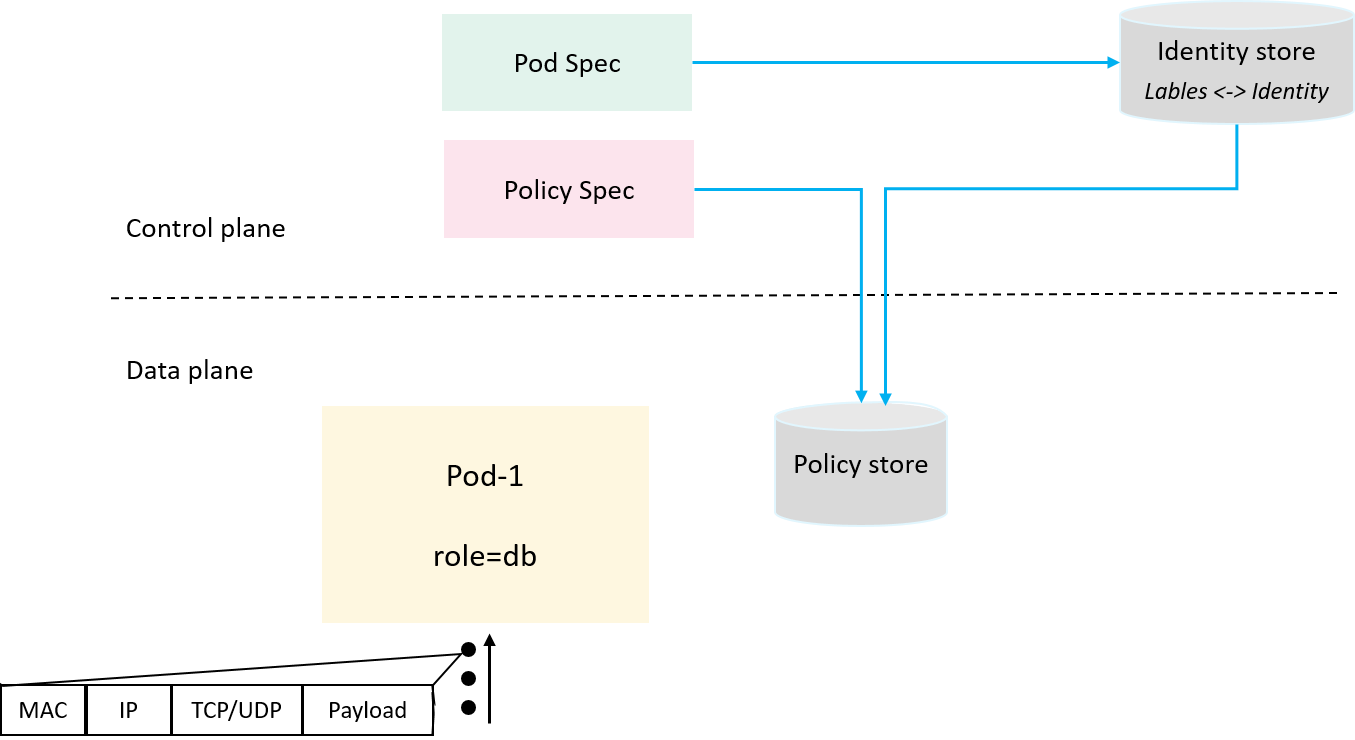
Fig 2-3. Dataplane aware policy cache
For performance consideration, the policy cache should be designed as a per-node or per-pod cache. Here we use a per-pod model, e.g. for the policy mentioned at the beginning of the post,
spec:
  podSelector:             # Targets that this NetworkPolicy will be applied on
    matchLabels:
      role: db
  ingress:                 # Apply on targets's ingress traffic
  - from:
    - podSelector:         # Entities that are allowed to access the targets
        matchLabels:
          role: backend
    ports:                 # Allowed proto+port
    - protocol: TCP
      port: 6379
We use src_identity:proto:dst_port:direction as key, insert a rule into the
cache, the existence of the rule indicates that this src_identity could
access this proto:dst_port in that direction.
Table 2-2. Contents of the policy cache for a role=db pod
Key (SrcIdentity:Proto:Port:Direction) |
Value (value is ignored) |
10003:tcp:6379:ingress |
1 |
On receiving a packet, if we could decide which application it comes
from (src_identity), then a verdict over the packet
can be determined by matching policies in this cache: if a rule is matched, let
the packet go, otherwise just drop it.
Now the question turns to: how to correlate a packet to its (the sender's) identity. Enter IP address cache.
2.4 Introducing IPCache: PodIP -> Identity
While there are many cases when correlating a packet to its identity, here we start from the hard one: user traffic is not modified or encapsulated by the networking solution. This means that we can’t get the identity information from a packet itself directly. Later we will see other scenarios.
Consider the fact that:
- A Pod’s IP address is unique (
hostNetworkpods are left for later discussions) - A Pod’s identity is deterministic (all pods with the same labels share the same identity)
So, pod IP can be uniquely mapped to the pod's identity.
Thus we introduce yet another cache: mapping pod’s IP to its identity,
we call this ipcache
and globally share this information, as shown below:
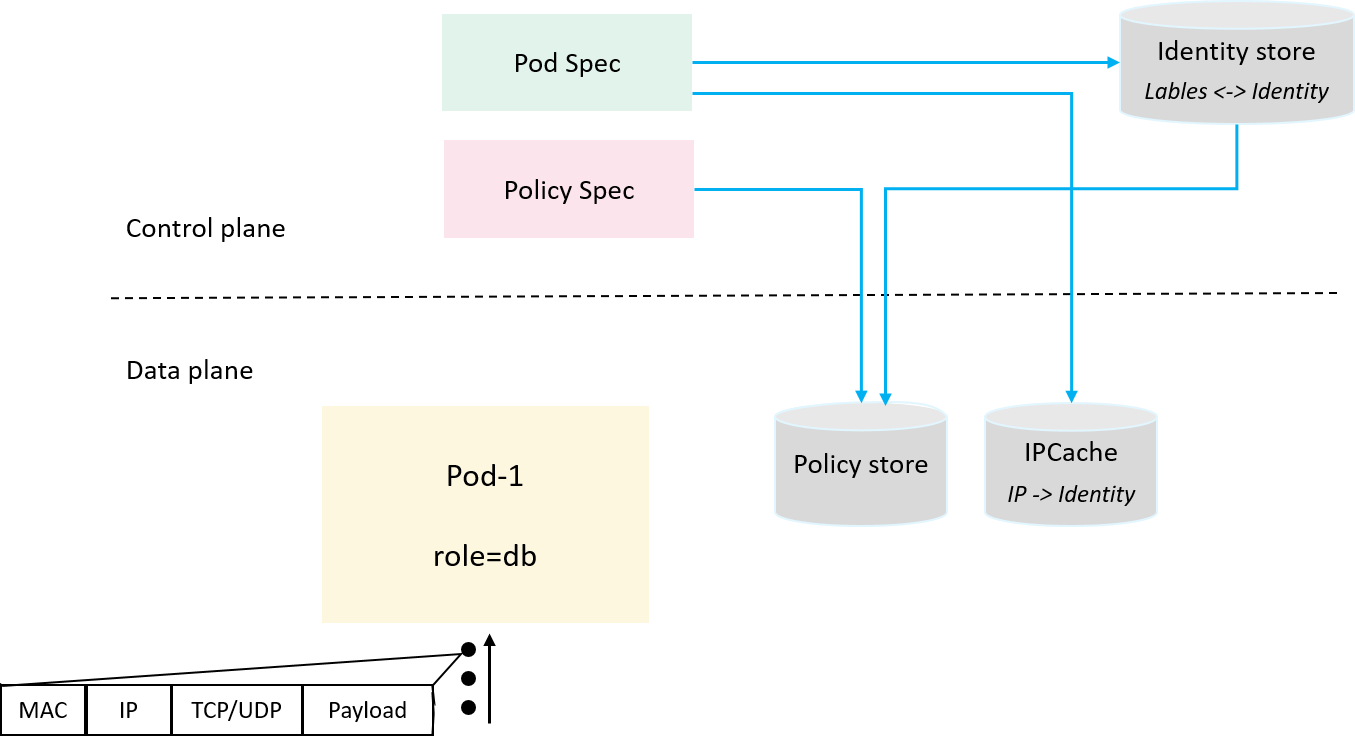
Fig 2-4. Introducing ipcache to hold IP->Identity mappings
For example, if role=frontend has two pods 10.5.2.2 and 10.5.3.3, and
role=backend has a pod 10.5.4.4, then in ipcache we’ll have:
Table 2-3. IP cache
Key (IP) |
Value (Identity) |
10.5.2.2 |
10001 |
10.5.3.3 |
10001 |
10.5.4.4 |
10002 |
Our puzzle is almost done! Since IP address can be parsed from each packet! Then, with an exact reverse steps through the previous sections, our policy enforcer cloud just decide whether to let the packet go!
2.5 Hooking and parsing traffic
Now make up the last piece of our solution: hooking traffic, extract IP/proto/ports information from packet headers, then query and enforce policies:
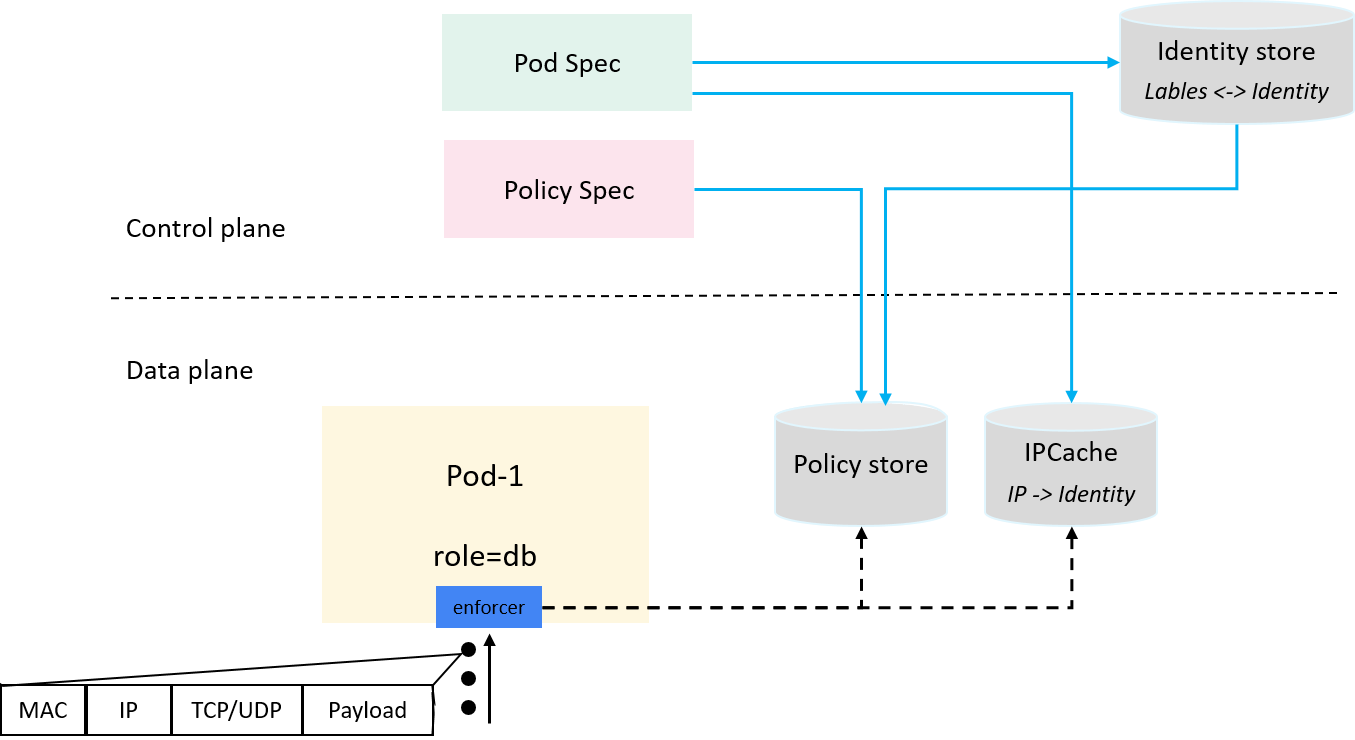
Fig 2-5. Hooking and parsing traffic, and querying and enforcing ingress policies
2.6 Compose up: an end-to-end workflow
Now let’s see a hypothetical end-to-end example:
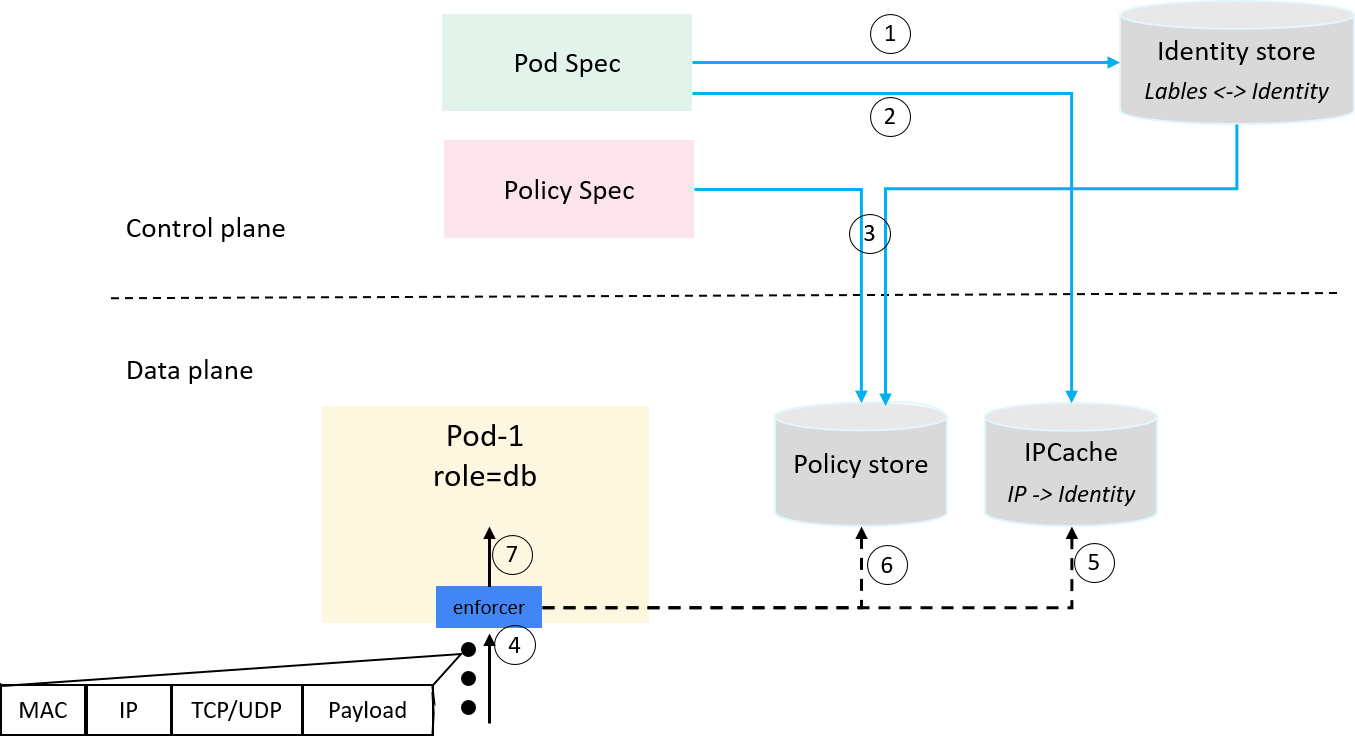
Fig 2-6. An end-to-end workflow
The step 1~3 are control plane related:
- 1) Pods created, identities allocated and seen by all parties (global identity store);
- 2)
ip->identitymappings synchronized to dataplane ipcache; - 3) Policy created, transformed from label-based description to identity-based description, and synchronized to dataplane policy cache;
Then when client traffic reaches a server pod, our policy enforcer starts to work:
- 4) Parse packet header, extract IP/Proto/Port etc information;
- 5) Get src_identity from ipcache with
src_ipas key; - 6) Get policy from policy cache with src_identity/proto/dst_port/direction information;
- 7) Verdict:
allowif policy found, otherwisedeny.
Great, works wonderful, at least in theory! Now let’s implement it with some POC code.
3 Implement the enforcer with eBPF
This post mainly focuses on the dataplane part, so for the POC implementation, we’ll just hardcode something that the control plane does (step 1~3). For the dataplane (step 4~7) part, we use eBPF.
3.1 The code
Some macros, constants, structures, as well as our policy cache itself (hardcoded with just one rule):
const int l3_off = ETH_HLEN;        // IP header offset in raw packet data
const int l4_off = l3_off + 20;     // TCP header offset: l3_off + IP header
const int l7_off = l4_off + 20;     // Payload offset: l4_off + TCP header

#define DB_POD_IP         0x020011AC // 172.17.0.2 in network order
#define FRONTEND_POD_IP   0x030011AC // 172.17.0.3 in network order
#define BACKEND_POD1_IP   0x040011AC // 172.17.0.4 in network order
#define BACKEND_POD2_IP   0x050011AC // 172.17.0.5 in network order

struct policy {           // Ingress/inbound policy representation:
    int    src_identity;  // traffic from a service with 'identity == src_identity'
    __u8   proto;         // are allowed to access the 'proto:dst_port' of
    __u8   pad1;          // the destination pod.
    __be16 dst_port;
};
struct policy db_ingress_policy_cache[4] = { // Per-pod policy cache,
    { 10003, IPPROTO_TCP, 0, 6379 },         // We just hardcode one policy here
    {},
};
The datapath logic, including ipcache and policy cache lookup, as well as the main hooking and policy verdict logic:
static __always_inline int ipcache_lookup(__be32 ip) {
    switch (ip) {
        case DB_POD_IP:        return 10001;
        case FRONTEND_POD_IP:  return 10002;
        case BACKEND_POD1_IP:  return 10003;
        case BACKEND_POD2_IP:  return 10003;
        default:               return -1;
    }
}

static __always_inline int policy_lookup(int src_identity, __u8 proto, __be16 dst_port) {
    struct policy *c = db_ingress_policy_cache;
    for (int i=0; i<4; i++) {
        if (c[i].src_identity == src_identity && c[i].proto == proto && c[i].dst_port == dst_port)
            return 1;
    }

    return 0; // not found
}

static __always_inline int __policy_can_access(struct __sk_buff *skb, int src_identity, __u8 proto) {
    void *data = (void *)(long)skb->data;
    void *data_end = (void *)(long)skb->data_end;

    if (proto == IPPROTO_TCP) {
        if (data_end < data + l7_off)
            return 0;

        struct tcphdr *tcp = (struct tcphdr *)(data + l4_off);
        return policy_lookup(src_identity, proto, ntohs(tcp->dest))? 1 : 0;
    }

    return 0;
}

__section("egress") // veth's egress relates to pod's ingress
int tc_egress(struct __sk_buff *skb) {
    // 1. Basic validation
    void *data = (void *)(long)skb->data;
    void *data_end = (void *)(long)skb->data_end;
    if (data_end < data + l4_off) // May be system packet, for simplicity just let it go
        return TC_ACT_OK;

    // 2. Extract header and map src_ip -> src_identity
    struct iphdr *ip4 = (struct iphdr *)(data + l3_off);
    int src_identity = ipcache_lookup(ip4->saddr);
    if (src_identity < 0) // packet from a service with unknown identity, just drop it
        return TC_ACT_SHOT;

    // 3. Determine if traffic with src_identity could access this pod
    if (__policy_can_access(skb, src_identity, ip4->protocol))
        return TC_ACT_OK;

    return TC_ACT_SHOT;
}
With an understanding of the design in section 2, this code should be simple enough and just explains itself.
3.2 Compile
$ export app=toy-enforcer
$ clang -O2 -Wall -c $app.c -target bpf -o $app.o
3.3 Load and attach
Load & attach bpf:
$ sudo tc qdisc add dev $nic clsact && sudo tc filter add dev $nic egress bpf da obj $app.o sec egress
Cleanup:
$ sudo tc qdisc del dev $nic clsact 2>&1 >/dev/null
Some explanations:
- We assume a pod uses veth pair as its network interface, this is true for most Kubernetes networking solutions;
$nicis the host end of the veth pair;- The host end of a veth pair has an opposite traffic direction with the container
side, e.g. the ingress traffic of a Pod corresponds to the
egress of the host end, and vise verses. That why we attach
the BPF program with
egressflag.
These stuffs will be more clear in the section with examples. Just go ahead if they confuse you now.
4 Test environment and verification
4.1 Test environment setup
For traffic control at Pod’s network interface, whether the traffic comes from the same node or other nodes doesn’t make a difference to us. So we can test the policy in such as simplified topology:
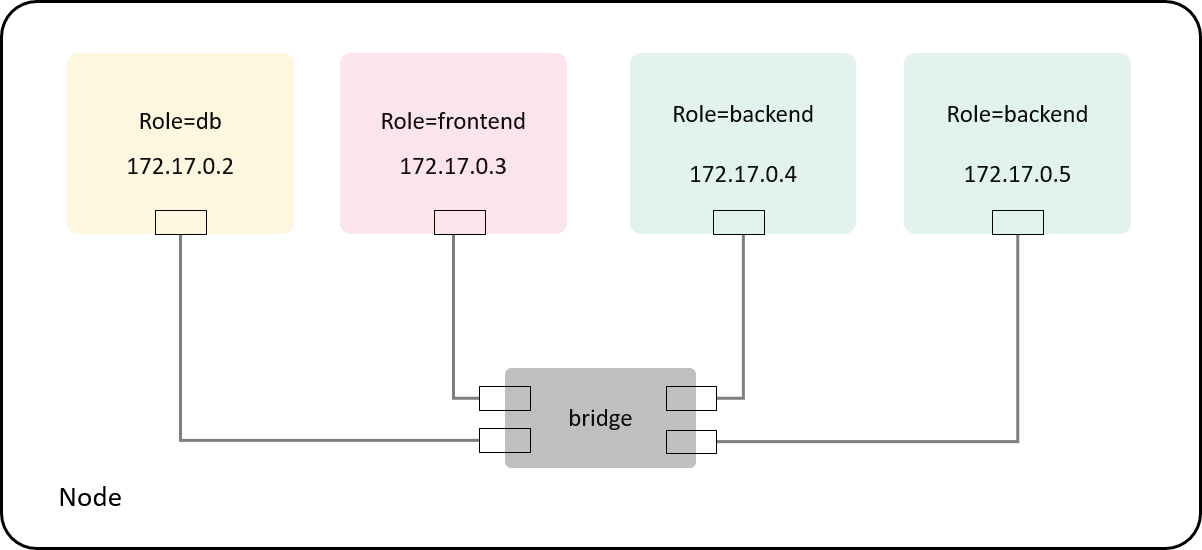
Fig 4-1. Test environment: simulating Pods with containers as they won't make difference for our case
Create four containers directly with docker run, each represent role=db, role=frontend and role=backend pods;
$ sudo docker run -d --name db redis:6.2.6
$ sudo docker run -d --name frontend redis:6.2.6 sleep 100d
$ sudo docker run -d --name backend1 redis:6.2.6 sleep 100d
$ sudo docker run -d --name backend2 redis:6.2.6 sleep 100d
Containers are connected to the default docker0 Linux bridge with veth pairs.
We use an official redis docker image, so we can test L4 connectivity easily.
We also will use nsenter-ctn to execute commands
in a container’s namespace to work around the missing of tools (e.g. ifconfig, iproute2, tcpdump) in the container,
# A simple wrapper over nsenter
function nsenter-ctn () {
    CTN=$1 # container ID or name
    PID=$(sudo docker inspect --format "{{.State.Pid}}" $CTN)
    shift 1 # remove the first arguement, shift others to the left
    sudo nsenter -t $PID $@
}
Put the snippet into your ~/.bashrc file then source ~/.bashrc.
Now first check the IP address of each "pod":
$ for ctn in db frontend backend1 backend2; do nsenter-ctn $ctn -n ip addr show eth0 | grep inet | awk '{print $2}'; done
172.17.0.2/16
172.17.0.3/16
172.17.0.4/16
172.17.0.5/16
4.2 Verification
Case 1: with no policy
Do a redis ping to the role=db container from each client container,
the server will return a PONG if all are right:
$ docker exec -it frontend sh    |   $ docker exec -it backend1 sh    |   $ docker exec -it backend2 sh
# redis-cli -h 172.17.0.2 ping   |   # redis-cli -h 172.17.0.2 ping   |   # redis-cli -h 172.17.0.2 ping
PONG                             |   PONG                             |   PONG
Just as expected! The result is illustrated as below:
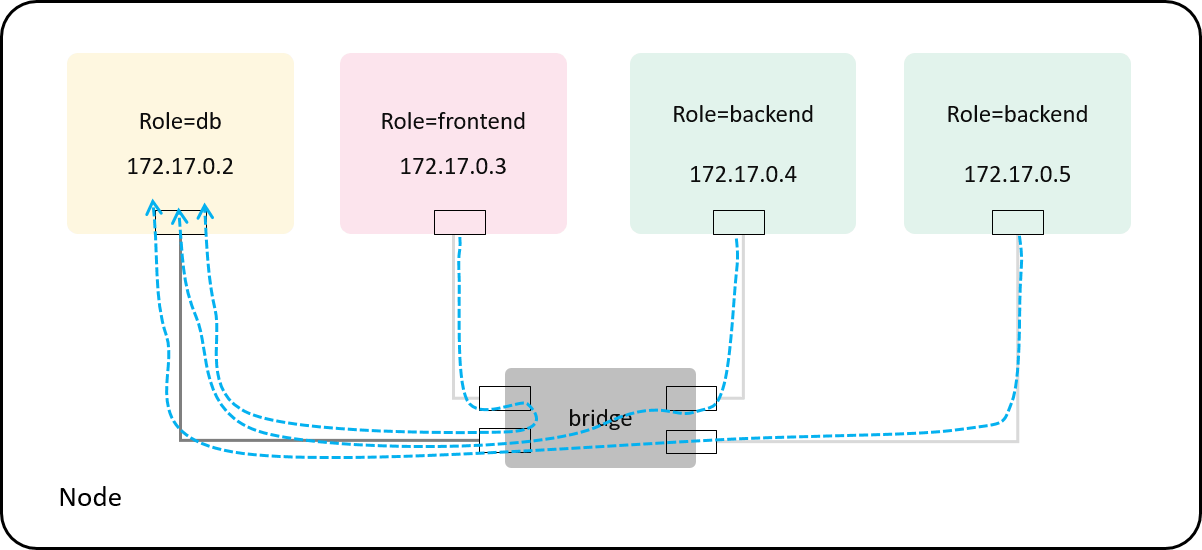
Fig 4-2. No policy: both frontend and backend pods can access tcp:6379@db
Case 2: with specific policy: allow role=backend -> tcp:6379@role=db
Now let’s load and attach our BPF program to the network interface of the role=db pod.
We have two possible places to attach the program:
- The container side of the veth pair (
eth0inside the container) - The host side of the veth pair (the
vethxxxdevice on the bridge)
The final policy effect will be the same, so we just select the second one, as
this avoids switching network namespaces when executing commands.
Now find the host end of the veth pair for role=db container:
$ nsenter-ctn db -n ip link
4: eth0@if5: <BROADCAST,MULTICAST,UP,LOWER_UP> mtu 1500 qdisc noqueue state UP mode DEFAULT
    link/ether 02:42:ac:11:00:02 brd ff:ff:ff:ff:ff:ff link-netnsid 0
Network devices with unique index 4 and 5 are the two ends of the veth pair,
so we look for the ifindex=5 device on the host, which is the device that we’ll attach BPF program to:
$ ip link
5: vethcf236fd@if4: <BROADCAST,MULTICAST,UP,LOWER_UP> mtu 1500 qdisc noqueue master docker0
    link/ether 66:d9:a0:1a:2b:a5 brd ff:ff:ff:ff:ff:ff link-netnsid 0
Now we can load & attach our BPF enforcer and the hardcoded policy in it:
$ export nic=vethcf236fd
$ sudo tc qdisc add dev $nic clsact && sudo tc filter add dev $nic egress bpf da obj  $app.o sec egress
Test again:
$ docker exec -it frontend sh    |   $ docker exec -it backend1 sh    |   $ docker exec -it backend2 sh
# redis-cli -h 172.17.0.2 ping   |   # redis-cli -h 172.17.0.2 ping   |   # redis-cli -h 172.17.0.2 ping
^C                               |   PONG                             |   PONG
backend1 and backend2 still ok, but frontend timed out
(as its packets got silently dropped by our enforcer according the policy),
just as expected:
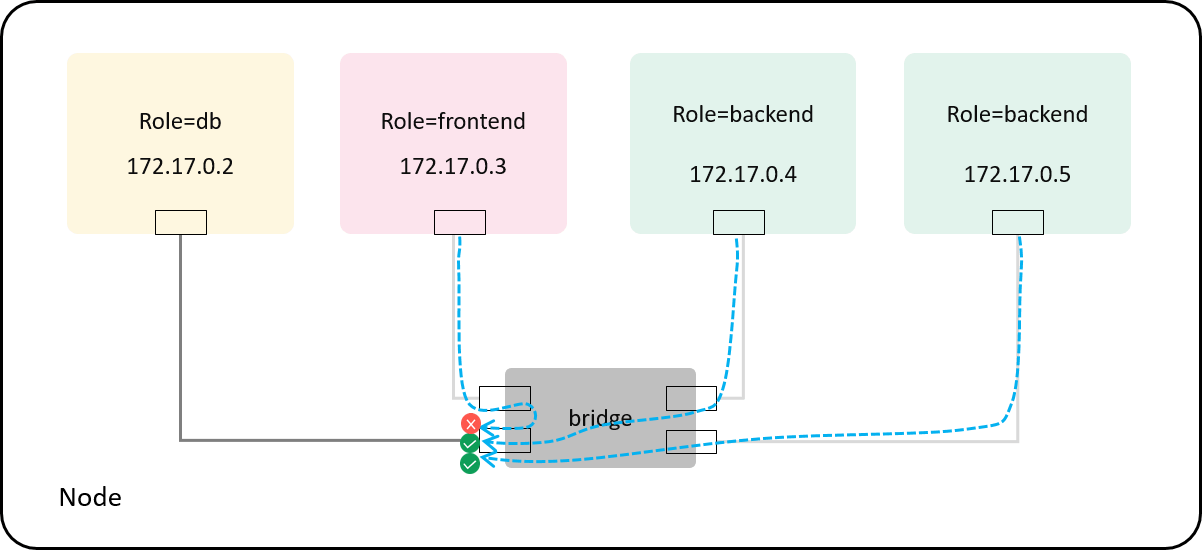
Fig 4-3. With a policy: frontend pod is denied and backend pods are allowed
Now remove the BPF enforcer and policy and test again:
$ sudo tc qdisc del dev $nic clsact 2>&1 >/dev/null
$ docker exec -it frontend sh    |   $ docker exec -it backend1 sh    |   $ docker exec -it backend2 sh
# redis-cli -h 172.17.0.2 ping   |   # redis-cli -h 172.17.0.2 ping   |   # redis-cli -h 172.17.0.2 ping
PONG                             |   PONG                             |   PONG
Connectivity for frontend pod restored!
Case 3: with default policy: allow any
We could also support a default allow any policy,
which has the lowest priority, and behaves just like there is no policy at all.
With this design, our toy policy enforcer could be loaded and attached when a pod
is created, and detached and removed when the pod is destroyed - consistent
with the life cycle of the pod.
The effect illustrated:
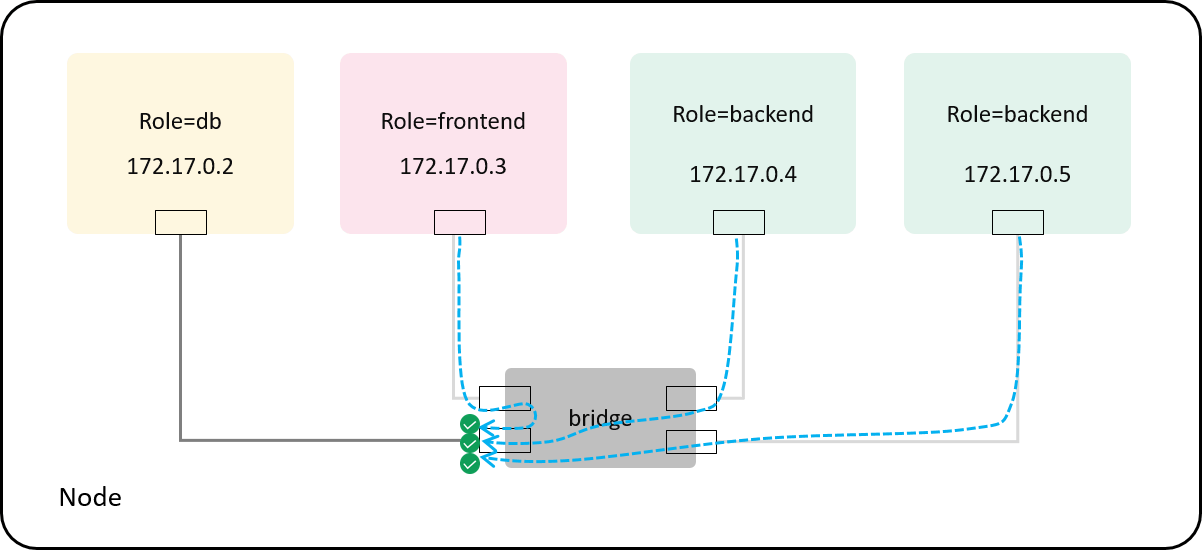
Fig 4-4. Default allow-any policy: enforcing at the host side of the veth pair
And the equivalent if you’re attaching the BPF program to the container side of the veth pair:
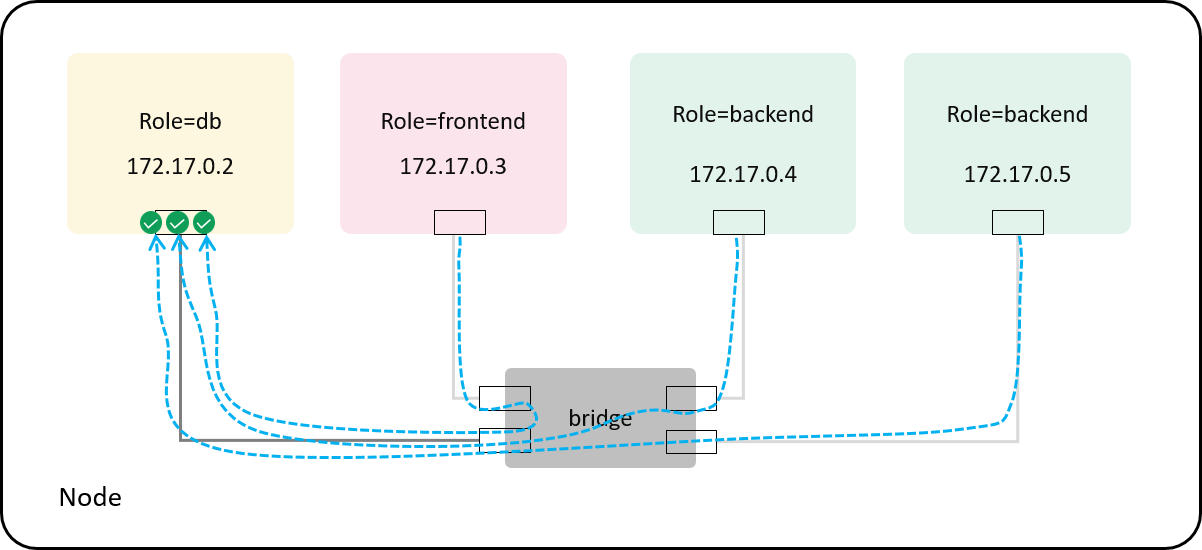
Fig 4-5. Default allow-any policy: enforcing at the container side of the veth pair
The default policy can be achieved easily:
we can denote a special {0, 0, 0, 0} rule as the default allow any rule,
then the inital policy cache for a pod will look like the following:
struct policy db_ingress_policy_cache[] = {
    { 0, 0, 0, 0 }, // default rule: allow any
};
As long as the user adds a specific policy, the agent for maintaining the policy cache should remove this default rule.
4.3 Logging & debugging
We also embedded some logging code in the source for debugging. To use it, first make sure the tracing switch is turned on:
$ sudo cat /sys/kernel/tracing/tracing_on
1
then cat the trace pipe to check the log:
$ sudo cat /sys/kernel/debug/tracing/trace_pipe | grep redis
    redis-server-2581    [001] d.s1 46820.560456: bpf_trace_printk: policy_lookup: 10003 6 6379
    redis-server-2581    [001] d.s1 46820.560468: bpf_trace_printk: Toy-enforcer: PASS, as policy found

       redis-cli-10540   [003] d.s1 46824.145704: bpf_trace_printk: policy_lookup: 10002 6 6379
       redis-cli-10540   [003] d.s1 46824.145724: bpf_trace_printk: Toy-enforcer: DROP, as policy not found
This ends our implementation and verification part, and in the next, let’s talk about some important stuffs in depth.
5 Discussions
5.1 Towards a practical NetworkPolicy solution
Re-depict Fig 2-6 here to facilitate our subsequent discussion:

Fig 2-6. An end-to-end workflow
To extend our design & implementation into a practical NetworkPolicy solution, more
things need to be done, just to name a few:
-
Automate step 1~3. Such as,
- Introducing a global identity store (instead of hardcode) and an identity allocation algorithm;
-
Introducing an agent for each node, which is responsible for
- Identity allocation,
- Watching policy resources in Kubernetes and converts and pushes to the dataplane policycache,
- Watching pod resources in Kubernetes and push
IP->identitymetadata to the local ipcache.
-
Perform per-flow instead of per-packet policy enforcement.
Such as, only lookup policy cache for the handshake packets of a TCP flow, and if a connection is allowed and established, all the subsequent packets of this flow can just go through without matching against the policy. This involves connection tracking (conntrack) [3].
-
Support other types of target selectors, such as namespace selector or IPBlock selector.
This is straight-forward and simple to implement in our solution.
-
Optimizations
- Embed identity along with the packet if we have additional head room, such as in VxLAN tunneling case. ipcache could be avoided in this scenario.
- Storage ipcache/policycache with suitable eBPF maps.
- Using hashing in policy lookup instead of several raw equality checks.
If all these stuffs have been resolved, you’ll get a native eBPF-based policy engine for Kubernetes. If time dates back to 2015, you could even name it Cilium!
5.2 NetworkPolicy support of Cilium
Cilium as a Kubernetes networking solution implements as well as extends
the standard Kubernetes NetworkPolicy. To be specific, it supports three
kinds of policies: standard Kubernetes NetworkPolicy, CiliumNetworkPolicy (CNP)
and ClusterwideCiliumNetworkPolicy (CCNP).
In the underlying, Cilium works much the same way as the toy enforcer in this post. To be specific, the components of our toy design can be directly mapped to the corresponding components in Cilium:
- Global identity store -> Cilium kvstore (cilium-etcd) [4]
- Per-node agent -> cilium-agent
- ipcache -> Cilium per-node ipcache (
/sys/fs/bpf/tc/globals/cilium_ipcache) - policy cache -> Cilium per-endpoint policy cache (
/sys/fs/bpf/tc/globals/cilium_policy_xx)
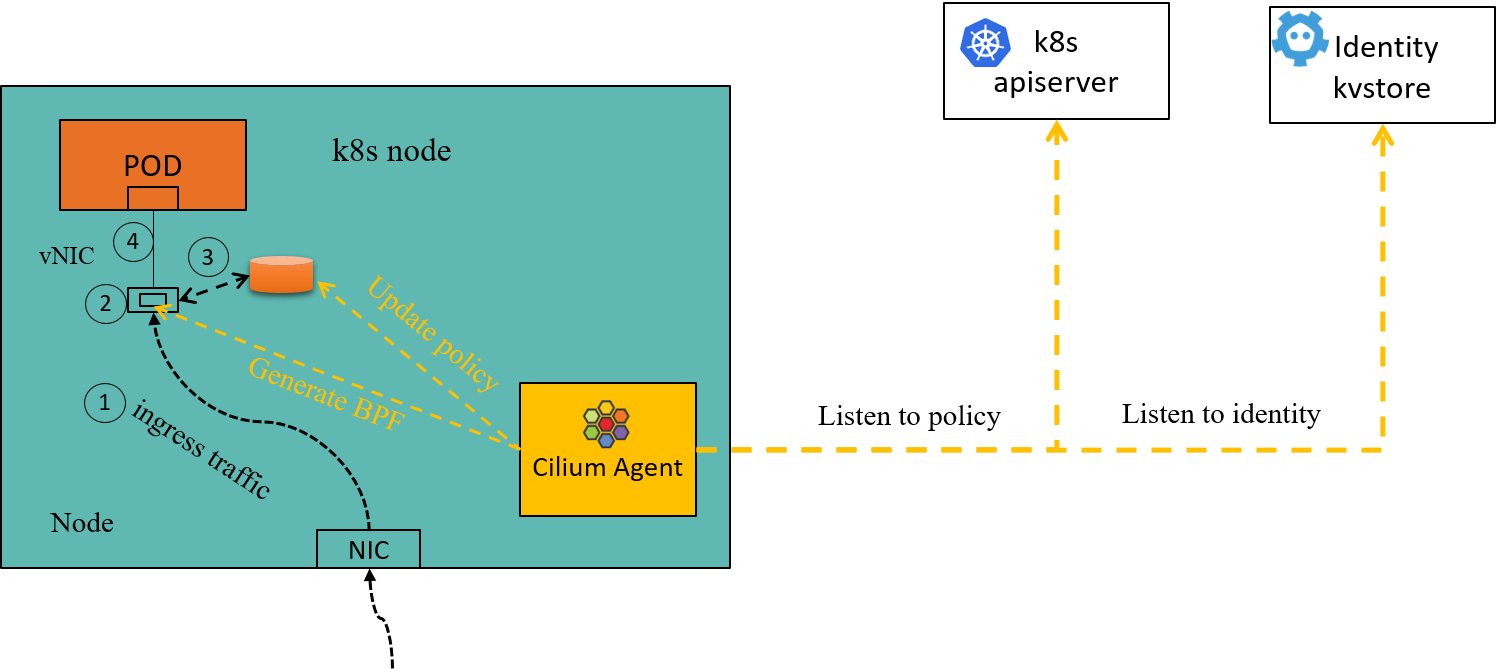
Fig 5-1. Ingress policy enforcement inside a Cilium node [1]
One thing we haven’t mentioned yet is that: the transparency property (transparently hooking and filter traffic) of our toy enforcer to the upper networking infrastructures makes it co-workable with some networking solutions that haven’t supported network policy yet, such flannel. This is also why Cilium supports CNI chaining with flannel.
5.3 Reflecting on the Kubernetes networking model
With all have been discussed above, it’s interesting to reflect on the Kubernetes networking model.
Kubernetes utilizes an "IP-per-Pod" model, which has three principles, let cracking them down and see what that implies to policy solution design:
-
Principle 1: "pods on a node can communicate with all pods on all nodes without NAT"
This is the core foundation of our security solution. Without this property, pod communications will be totally different, such as, via NAT and/or unique ports on the node, which will break our identity and ipcache design.
-
Principle 2: "agents on a node (e.g. system daemons, kubelet) can communicate with all pods on that node"
It’s unable to identify “nodes” in our previous design, and since all nodes can communicate to all pods, there will be security leaks if we can’t control from/to nodes of pod traffic. So we should introduce something to identify what’s a node, and even more accurate, what’s a local node and what’s a remote node to a pod. This is just what the
nodeandremote-nodespecial identities are meant for in Cilium.Besides, Cilium also supports a so-called “host firewall”, targeting traffic from/to nodes (identified by node ip in the underlying).
-
Principle 3: "pods in the host network of a node can communicate with all pods on all nodes without NAT"
Again, this property conflicts with our ipcache design: although label selectors could identify those pods, they have no ip addresses. This is also a limitation of Cilium (hostNetwork pods can not be distinguished from each other).
6 Conclusion
This post designs an educational policy engine for Kubernetes NetworkPolicy
, and implements it in less than 100 lines of eBPF code (with no
surprises, code snippets stole from Cilium project,
and intentionally named variables/functions in the Cilium style).
After reading through this post, users should be more familiar with the underlying working mechanisms of access control in Kubernetes+Cilium.