Cilium ClusterMesh: A Hands-on Guide
- TL;DR
- 1 Introduction
- 2 Test environment
- 3 ClusterMesh setup
- 4 Network policy test
- 5 Conclusion
- References
- Appendix: yaml files
TL;DR
Cilium provides clustermesh for global Service load balancing and network policy enforcement across different Kubernetes clusters [1].
While the official documentation
ships with a step-by-step guide, it hides too many
details as it uses higher-level tools (helm, clustermesh-tools, etc) to
generate configuration files for you. If you are interested in the underlying
hooks, this post may be for you. We will manually set up a clustermesh and
test global network policies.
NOTE: We internally use
cilium-composeinstead of the community daemonset+configmap for cilium deploying. The purpose of this post is NOT to promote cilium-compose, but to share some hands-on experience on Cilium clustermesh.
1 Introduction
1.1 Cilium-powered k8s cluster
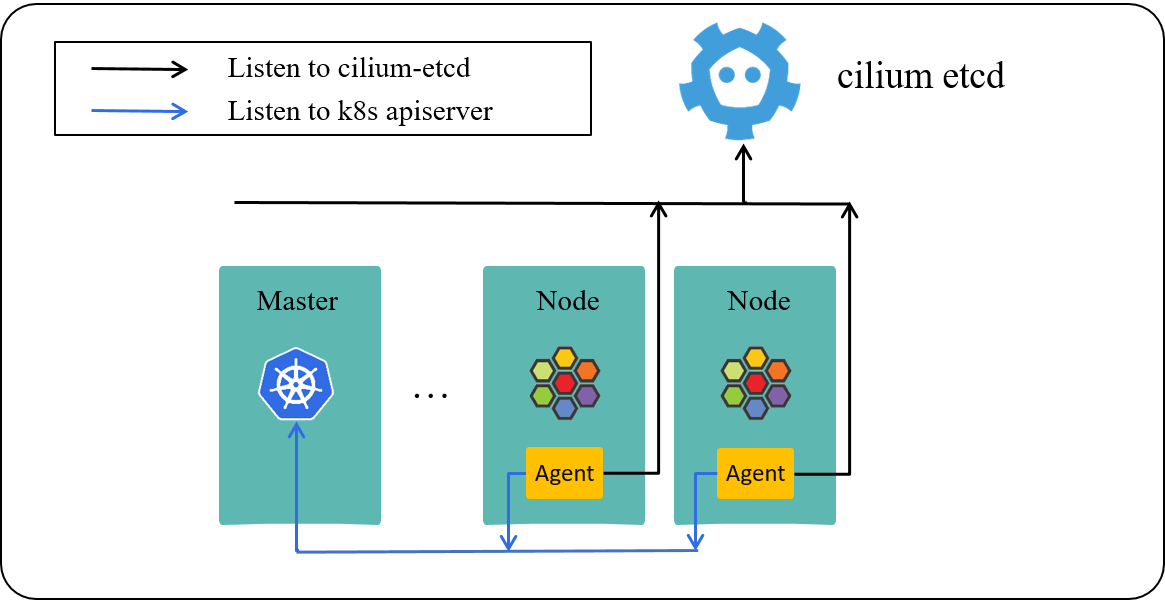
Fig 1-1. Cilium powered Kubernetes cluster
Fig 1-1 lists three important components in a cilium-powered Kubernetes cluster:
apiserver: k8s API server on master node.- K8s commands such as
kubectl create/apply/delete/get/describe xxxwill send requests to apiserver.
- K8s commands such as
cilium-agent: the daemon/agent runs on each worker node.- listen to resource changes in k8s
apiserver - listen to network policy changes in
cilium-etcd - IP allocation (for non-ENI-mode)
- Pod network setup
- network policy enforcement
- listen to resource changes in k8s
cilium-etcd: kvstore (repository) which stores information such as:- nodes info
- identity info
- L3/L4/L7 network policies
1.2 Multi-cluster scenarios (why multi-cluster?)
To address practical challenges, such as disaster recovery, business management, infra easy-of-maintanance, you may have deployed your business applications into multiple clusters.
In such cases, there are different granularities when determining which specific instance (pod) should be placed into which cluster:
- by service: e.g. all pods of service
svc1placed into cluster1, and all pods of servicesvc2to cluster2. - by pods: split a service’s pods into e.g. two groups, with the first half scheduled to cluster1, and the second half to cluster2.
This will result to different models/patterns when accessing services in other clusters.
1.3 Cross-cluster accessing models
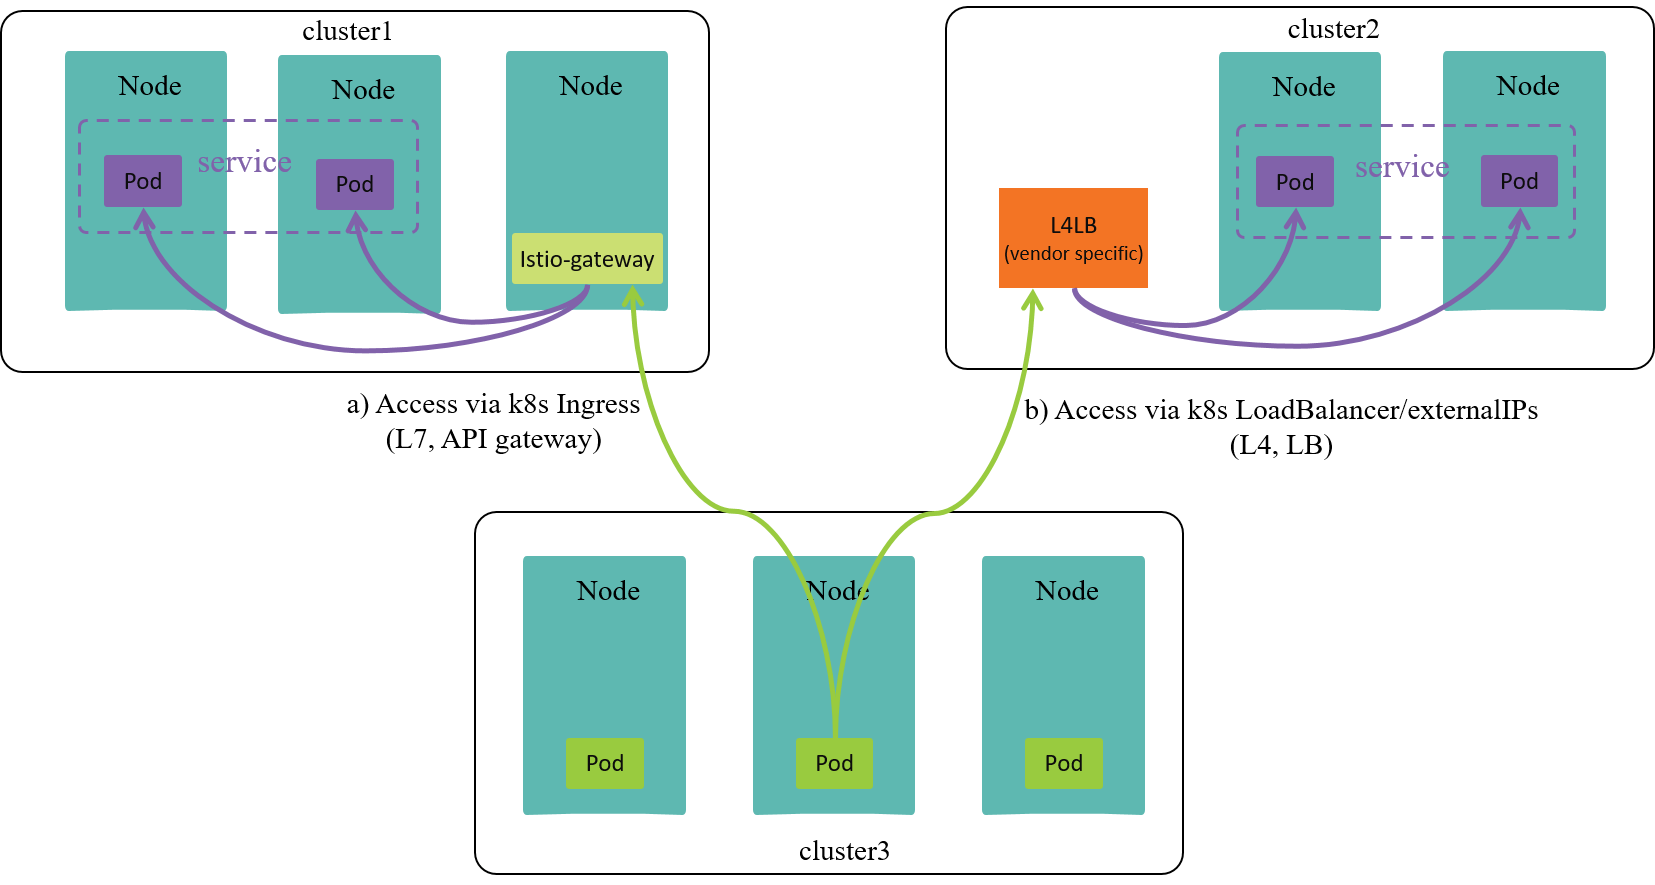
Fig 1-2. Cross-cluster service accessing models
As shown in Fig 1-2, if a client in cluster1 would like to access a service
svc in other clusters, the models may be:
- k8s Ingress: via L7
- A model described by k8s, but need to be implemented by network plugins/vendors
- Expose service via a layer 7 proxy, such as
istio-gateway istio-gatewayas an API gateway is reachable from other clusters.
- k8s LoadBalancer or externalIPs: via L4
- A model described by k8s, but need to be implemented by network plugins/vendors (more on this, see [5]).
- Expose service via externalIPs.
- externalIPs, most oftenly provided by cloud vendor, is reachable from other clusters, and will load balance traffic to the right backends of services.
- other vendor specific solutions, such as Cilium’s clustermesh: via L3 in some sense.
- This is not a k8s model, but an specific implementation provided by Cilium.
- Enable cross-cluster k8s
Services, the pods of aServicecan scatter into different clusters. - A client pod can access
Services in any cluster, regardless of where (which cluster) the backends of theServiceare running on. - Also support cross-cluster network policy.
1.4 Where clustermesh is needed
If you have scattered your pods of a same service into different clusters
(the 2nd case in section 1.2), and you would like service
discovery/load-balancing or enforce network policies on these services, you
may need clustermesh.
In the remaining of this post, we will show how to set up a clustermesh, , and test network policy enforcements in the mesh.
2 Test environment
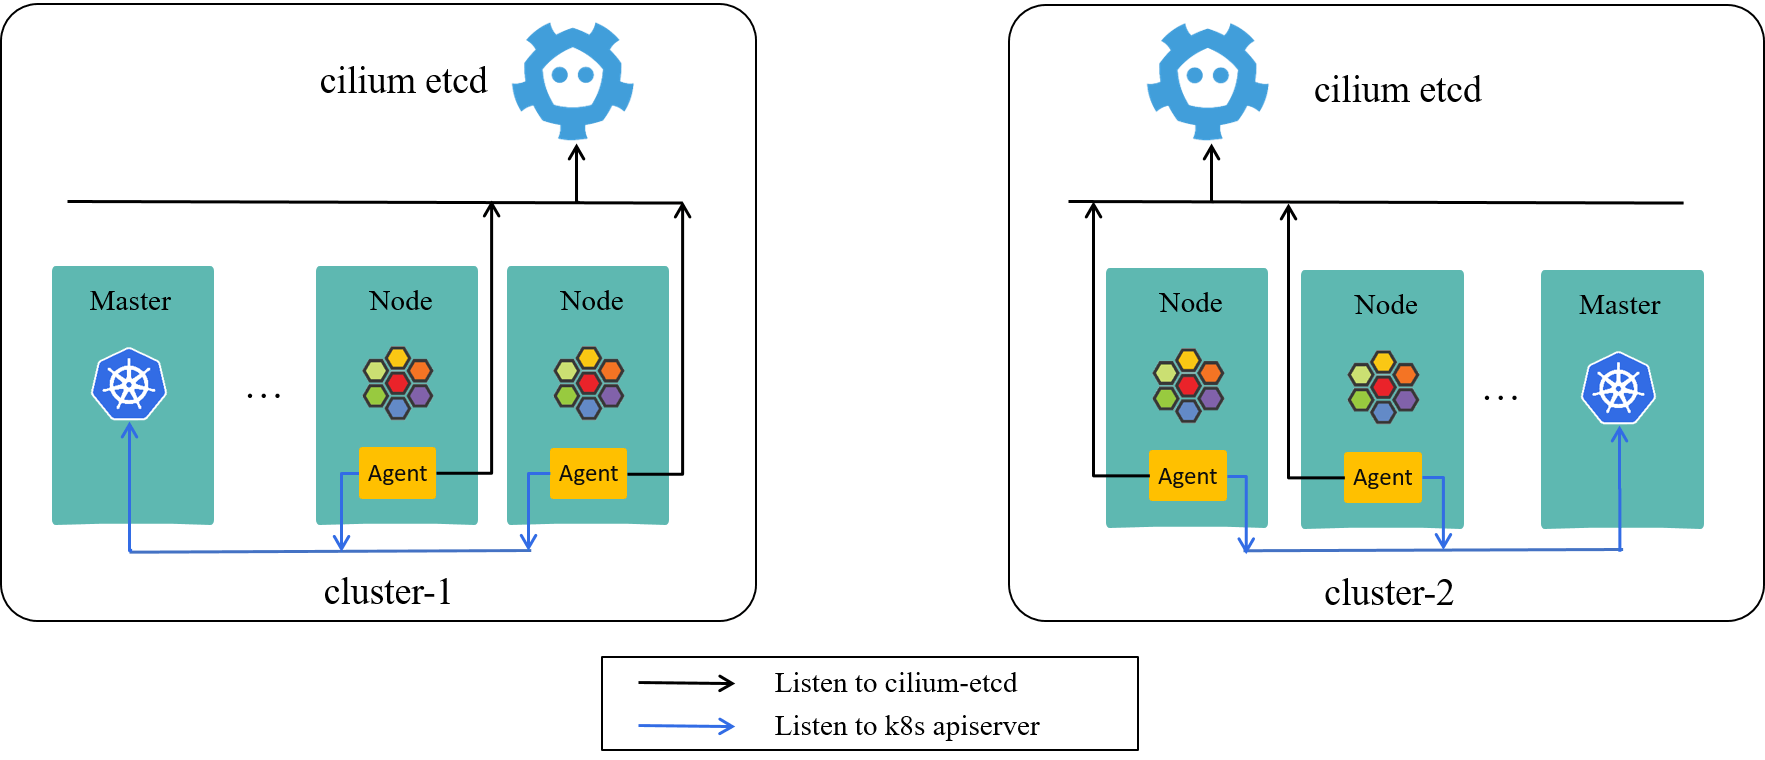
Fig 2-1. Two distinct k8s clusters, each with their own cilium-etcd
As shown in Fig 2-1, we use two k8s clusters as our test environment in this post. These two clusters are equipped with following properties:
- Use direct routing [2,4] for cross-host networking.
- No overlapping of node IPs between the two clusters.
- No overlapping of PodCIDRs between the two clusters.
- No firewall rules that blocks communication between the two clusters.
This meets the prerequisites of clustermesh as detailed in [1].
3 ClusterMesh setup
This section details the process of turning the above two clusters into a clustermesh.
3.1 Configuration changes
On the basis of the above two running clusters, add additional configurations to cilium agents:
cluster-name: unique string across all clusterscluster-id: unique integer between 0~255 across all clustersclustermesh-config: directory containing all cilium-etcd configuration files of other clusters (note that the configuration file name of each cluster must be the same as the cluster name)
The ideas behind these configurations are:
- Ensure each cluster has a unique identifier (cluster name and ID).
- Make cilium agents in one cluster listen to network policy changes in other clusters.
Withe the above conditions met, each cluster will have a global view of the services and network policies across all clusters.
The resulted mesh will look like Fig 3-1 as shown below:
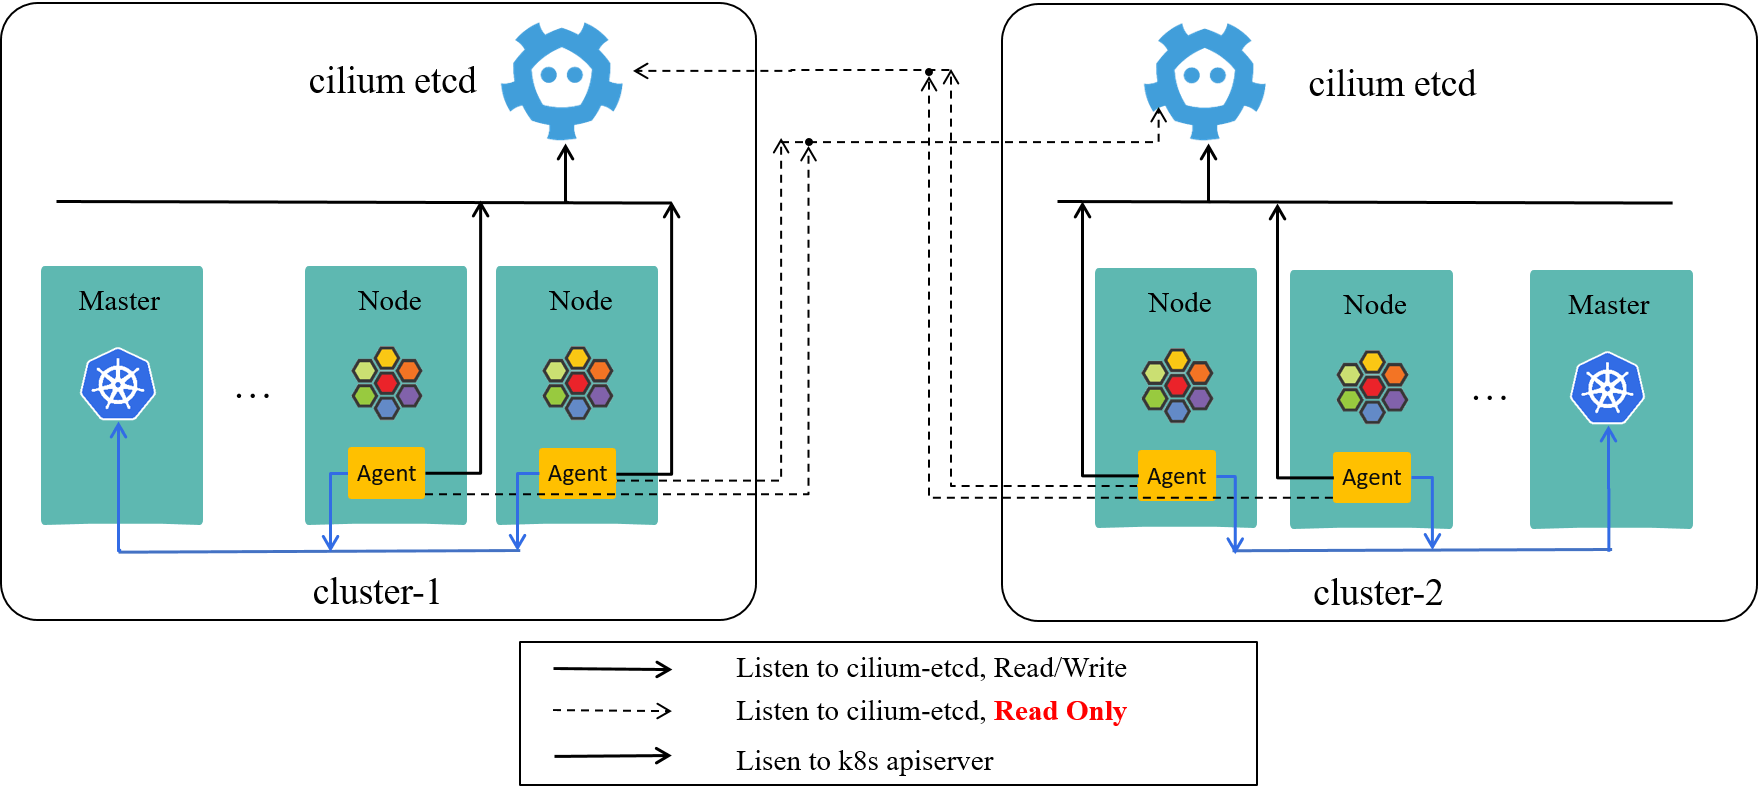
Fig 3-1. ClusterMesh, cilium-agent listens to other clusters
Re-depict Fig 2-1 here, you can see the changes (actually are add-ons) more clearly with side-by-side comparison:
Re-depict Fig 2-1. Two distinct k8s clusters, each with their own cilium-etcd
Now let’s see the detailed configuring steps.
3.1.1 Configure cluster1
Pass new parameters to cilium-agent via CLI (could also via configmap):
# previous
$ cilium-agent --config-dir=/tmp/cilium/config-map

# now
$ cilium-agent --config-dir=/tmp/cilium/config-map \
    --cluster-id=101 --cluster-name=cluster1 --clustermesh-config=/var/lib/cilium/clustermesh
where /var/lib/cilium/clustermesh is mounted from host path mount/var/lib/cilium/clustermesh/
(specified in docker-compose.yaml in our case):
(cluster1 node1) $ ls mount/var/lib/cilium/clustermesh/
cluster2
cluster2-etcd-client-ca.crt
cluster2-etcd-client.crt
cluster2-etcd-client.key

(cluster1 node1) $ cat mount/var/lib/cilium/clustermesh/cluster2
endpoints:
  - https://10.2.2.2:2379

ca-file:   '/var/lib/cilium/clustermesh/cluster2-etcd-client-ca.crt'
key-file:  '/var/lib/cilium/clustermesh/cluster2-etcd-client.key'
cert-file: '/var/lib/cilium/clustermesh/cluster2-etcd-client.crt'
After cilium-agent restarted, we could see logs like this:
(cluster1 node1) $ docker logs -f cilium-agent
...
level=info msg="Successfully verified version of etcd endpoint" config=/var/lib/cilium/clustermesh/cluster2 endpoints="[https://10.2.2.2:2379]" etcdEndpoint="https://10.2.2.2:2379"
level=info msg="Connection to remote cluster established" clusterName=cluster2 config=/var/lib/cilium/clustermesh/cluster2 kvstoreErr="<nil>"
3.1.2 Configure cluster2
Similar as 3.1.1, cilium-agent CLI:
$ cilium-agent --config-dir=/tmp/cilium/config-map \
    --cluster-id=102 --cluster-name=cluster2 --clustermesh-config=/var/lib/cilium/clustermesh
and files in /var/lib/cilium/clustermesh (mounted from host path mount/var/lib/cilium/clustermesh/):
(cluster2 node1) $ ls mount/var/lib/cilium/clustermesh/
cluster1
cluster1-etcd-client-ca.crt
cluster1-etcd-client.crt
cluster1-etcd-client.key

(cluster2 node1) $ cat mount/var/lib/cilium/clustermesh/cluster1
endpoints:
  - https://10.1.1.1:2379

ca-file:   '/var/lib/cilium/clustermesh/cluster1-etcd-client-ca.crt'
key-file:  '/var/lib/cilium/clustermesh/cluster1-etcd-client.key'
cert-file: '/var/lib/cilium/clustermesh/cluster1-etcd-client.crt'
Logs after restarting cilium-agent:
(cluster2 node1) $ docker logs -f cilium-agent
...
level=info msg="Successfully verified version of etcd endpoint" config=/var/lib/cilium/clustermesh/cluster1 endpoints="[https://10.1.1.1:2379]" etcdEndpoint="https://10.1.1.1:2379"
level=info msg="Connection to remote cluster established" clusterName=cluster1 config=/var/lib/cilium/clustermesh/cluster1 kvstoreErr="<nil>"
3.2 Verify clustermesh syncing
Check cluster status:
(cluster1 node1) $ cilium status
KVStore:                Ok   etcd: ...
Kubernetes:             Ok   1.17+ (v1.17.6-3) [linux/amd64]
...
ClusterMesh:            2/2 clusters ready, 0 global-services
More verbose:
(cluster1 node1) $ cilium status --verbose
KVStore:                Ok   etcd: ...
Kubernetes:             Ok   1.17+ (v1.17.6-3) [linux/amd64]
...
ClusterMesh:   1/1 clusters ready, 0 global-services
   cluster2: ready, 23 nodes, 2618 identities, 0 services, 0 failures (last: never)
   └  etcd: 1/1 connected, ...
List all nodes of all clusters in the mesh:
(cluster1 node1) $ cilium node list
Name               IPv4 Address   Endpoint CIDR    IPv6 Address   Endpoint CIDR
cluster1/node1     10.xx.xx.xx   10.xx.xx.xx/24
cluster1/node2     10.xx.xx.xx   10.xx.xx.xx/24
...
cluster2/node1     10.xx.xx.xx   10.xx.xx.xx/24
cluster2/node2     10.xx.xx.xx   10.xx.xx.xx/24
...
Check identities:
(cluster1 node1) $ cilium identity list
... # all identities in both cluster1 and cluster2
(cluster1 node1) $ cilium identity list | awk 'NF>1  {print $1}' | sort | uniq -c | awk '$1>1 {print $0}'
      2 10575 # -> same identity ID appears more than once, indicating at least one is from remote clusters
      2 10876
      2 11091
      ...
4 Network policy test
We create a simple server-client system to test the network policy enforcement of clustermesh:
protected-db: the server side, listens at port6379- should only allow access from
employeepods, regardless of the cluster thatemployeepod exists
- should only allow access from
employee: the client side, should be allowed to accessprotected-db- all other pods: not allowed to access
protected-db- we will create a pod named
strangeras such a representative
- we will create a pod named
The final effect we want to achieve is depicted in Fig 4-1:

Fig 4-1. Final results we want to achieve
4.1 Create server and clients
4.1.1 Create server in cluster1
Server yaml protected-db.yaml:
apiVersion: apps/v1
kind: StatefulSet
metadata:
  name: protected-db
  annotations:
    io.cilium/global-service: "true"
spec:
  replicas: 1
  selector:
    matchLabels:
      app: protected-db
  serviceName: ""
  template:
    metadata:
      labels:
        app: protected-db
    spec:
      # affinity:
      #   nodeAffinity:
      #     requiredDuringSchedulingIgnoredDuringExecution:
      #       nodeSelectorTerms:
      #       - matchExpressions:
      #         - key: kubernetes.io/hostname
      #           operator: In
      #           values:
      #           - node1
      containers:
      - image: redis:6.0.5-alpine
        name: protected-db
Enable the node affinity section in the above yaml if you’d like to schedule the pod to a specific node.
The special part compared with normal (non-clustermesh) Services is the
io.cilium/global-service: "true" annotation in metadata section, which
tells Cilium agent that this is a Service with backend pods across different clusters:
  annotations:
    io.cilium/global-service: "true"
Now create it in default namespace:
(cluster1 master) $ k create -f protected-db.yaml
(cluster1 master) $ k get pod | grep protected-db
protected-db-0   1/1     Running     0          11s     10.3.3.3      node1
4.1.2 Create client in cluster1
We will create clients in default namespace as well:
(cluster1 master) $ k create -f employee.yaml
(cluster1 master) $ k create -f stranger.yaml

(cluster1 master) $ k get pod | grep employee
employee-0      1/1     Running     0          12m
(cluster1 master) $ k get pod | grep stranger
stranger-0      1/1     Running     0          12m
4.1.3 Create client in cluster2
Create an employee in cluster2, but in a namespace other than default,
we intentionally design it this way so that we could see the namespace selectors
in network policy later:
(cluster2 master) $ k create -f employee.yaml -n istio-space
4.2 Connectivity test
With the above setups done, let’s verify the basic connectivity between clients and server.
As we use redis image for both clients and server, we will test connectivity
with redis commands. redis-cli command line parameters:
-h <host>: specify host IP address-p <port>: specify port
# access protected-db from cluster1-employee:
(cluster1 master) $ k exec employee-0 redis-cli -- -h 10.3.3.3 -p 6379 ping
PONG

# access protected-db from cluster1-stranger:
(cluster1 master) $ k exec stranger-0 redis-cli -- -h 10.3.3.3 -p 6379 ping
PONG

# access protected-db from cluster2-employee:
(cluster2 master) $ k exec employee-0 -n istio-space redis-cli -- -h 10.3.3.3 -p 6379 ping
PONG
All accessible! Effects as shown below:

Fig 4-2. Connectivity before applying network policy
4.3 Apply global network policy
We will apply a L4 policy at protected-db’s ingress path.
l4-policy.yaml:
apiVersion: "cilium.io/v2"
kind: CiliumNetworkPolicy
metadata:
  name: "clustermesh-ingress-l4-policy"
  description: "demo: allow only employee to access protected-db"
spec:
  endpointSelector:
    matchLabels:
      app: protected-db
      io.cilium.k8s.policy.cluster: cluster1
  ingress:
  - toPorts:
    - ports:
      - port: "6379"
        protocol: TCP
    fromEndpoints:
      - matchLabels:
          app: employee
          io.cilium.k8s.policy.cluster: cluster2
          k8s:io.kubernetes.pod.namespace: istio-space
      - matchLabels:
          app: employee
          # io.cilium.k8s.policy.cluster: cluster1
          k8s:io.kubernetes.pod.namespace: default
Note that you must NOT add io.cilium.k8s.policy.cluster: cluster1 for the
clients within the same cluster (commented out in the above yaml), otherwise it
will behave abnormally (try it!).
(cluster1 master) $ k create -f l4-policy.yaml
ciliumnetworkpolicy.cilium.io/clustermesh-ingress-l4-policy configured
4.4 Test and observe
Now test again:
# access protected-db from cluster1-employee:
(cluster1 master) $ k exec employee-0 redis-cli -- -h 10.3.3.3 -p 6379 ping
PONG

# access protected-db from cluster1-stranger:
(cluster1 master) $ k exec stranger-0 redis-cli -- -h 10.3.3.3 -p 6379 ping
^C

# access protected-db from cluster2-employee:
(cluster2 master) $ k exec employee-0 -n istio-space redis-cli -- -h 10.3.3.3 -p 6379 ping
PONG
Fig 4-2. Network policy enabled at clustermesh scope
Capturing on the cilium-agent of the node that protected-db is running on, we
could see SYN packets coming from stranger get dropped by the agent:
(cluster1 node1) $ docker exec -it cilium-agent bash

(cluster1 node1 cilium-agent) # cilium monitor --type=drop
..
xx drop (Policy denied) flow 0x28c644b8 to endpoint 3833, identity 38354->6587186: 10.x.x.x:42728 -> 10.3.3.3:6379 tcp SYN
xx drop (Policy denied) flow 0x28c644b8 to endpoint 3833, identity 38354->6587186: 10.x.x.x:42728 -> 10.3.3.3:6379 tcp SYN
Actually all traffic not coming from employee’s will get dropped in
protected-db’s ingress path.
5 Conclusion
In this post, we showed how to set up a Cilium clustermesh by adding several (4,
to be specific) additional parameters to cilium agent, although the steps are
specific to our deploying fashion, it’s easy to adapt other fashions, e.g.
daemonset+configmap.
If you want to add more clusters into the mesh, just add the cilium-etcd’s
config file and corresponding certificates of the new clusters to
/var/lib/cilium/clustermesh directory as shown in the post, and they will form a
point-to-point cluster mesh.
References
- Cilium Doc: clustermesh
- Trip.com: First step towards cloud native networking
- Github: cilium-compose
- Cilium Doc: Using BIRD to run BGP
- L4LB for Kubernetes: Theory and Practice with Cilium+BGP+ECMP
Appendix: yaml files
employee.yaml:
apiVersion: apps/v1
kind: StatefulSet
metadata:
  name: employee
  annotations:
    io.cilium/global-service: "true"
spec:
  replicas: 1
  selector:
    matchLabels:
      app: employee
  serviceName: ""
  template:
    metadata:
      labels:
        app: employee
    spec:
      containers:
      - image: redis:6.0.5-alpine
        command: ["sleep"]
        args: ["100d"]
        name: employee
stranger.yaml:
apiVersion: apps/v1
kind: StatefulSet
metadata:
  name: stranger
  annotations:
    io.cilium/global-service: "true"
spec:
  replicas: 1
  selector:
    matchLabels:
      app: stranger
  serviceName: ""
  template:
    metadata:
      labels:
        app: stranger
    spec:
      containers:
      - image: redis:6.0.5-alpine
        command: ["sleep"]
        args: ["100d"]
        name: stranger