OVS Deep Dive 6: Internal Port
This post makes an exploration into OVS internal port.
1. Bridge
A bridge is a self-learning L2 forwarding device. IEEE 802.1D describes the bridge definition.
Bridge maintains a forwarding table, which stores {src_mac, in_port} pairs,
and forwards packets (more accurately, frames) based on dst_mac.
For example, when a packet with src_mac=ff:00:00:00:01 enters the bridge
through port 1 (in_port=1), the bridge learns that host ff:00:00:00:01
connected to it via port 1. Then it will add (if the entry is not cached yet) an
entry src_mac=ff:00:00:00:01, in_port=1 into its forwarding table. After
that, if a packet with dst_mac=ff:00:00:00:01 enters bridge, it decides that
this packet is intended for host ff:00:00:00:01, and that host is connected to
it via port 1, so it should be forwarded to port 1.
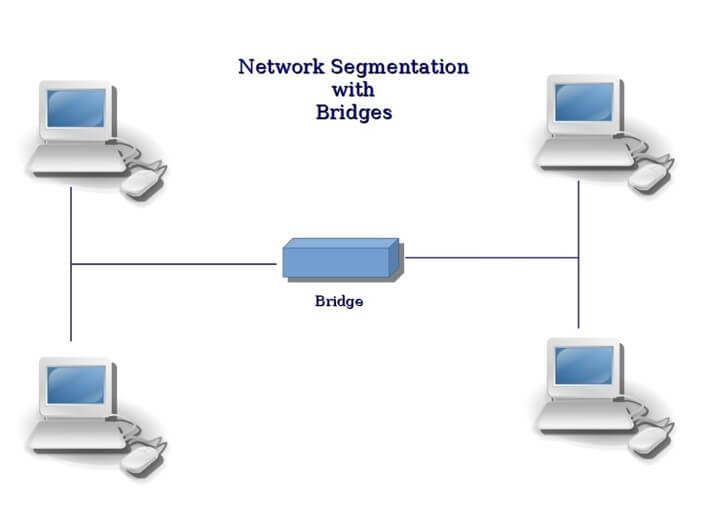
Fig.1.1 Hosts connected by a bridge
From the forwarding process we could see, a hypothetical bridge works entirely in L2. But in real environments, a bridge is always configured with an IP address. This seems a paradox: why we configure a L2 device with an IP address?
The reason is that for real a bridge, it must provide some remote management abilities to be practically useful. So there must be an access port that we could control the bridge (e.g. restart) remotely.
Access ports are IP based, so it is L3 ports. This is is different from other ports which just work in L2 for traffic forwarding - for the latter no IPs are configured on them, they are L2 ports.
L2 ports works in dataplane (DP), for traffic forwarding; L3 ports works in control plane (CP), for management. They are different physical ports.
2. Linux Bridge
Linux bridge is a software bridge, it implements a subset of the ANSI/IEEE 802.1d standard. It manages both physical NICs on the host, as well as virutal devices, e.g. tap devices.
Physical port managed by Linux bridge are all dataplane ports (L2 ports), they just forward packets inside the bridge. We’ve mentioned that L2 ports do not have IPs configured on them.
So a problem occurs when all the physical ports are added to the linux bridge: the host loses connection!
To keep the host reachable, there are two solutions:
- leave at least one physical port as accessing port
- use virtual accessing port
2.1 Solution 1: Physical Access Port
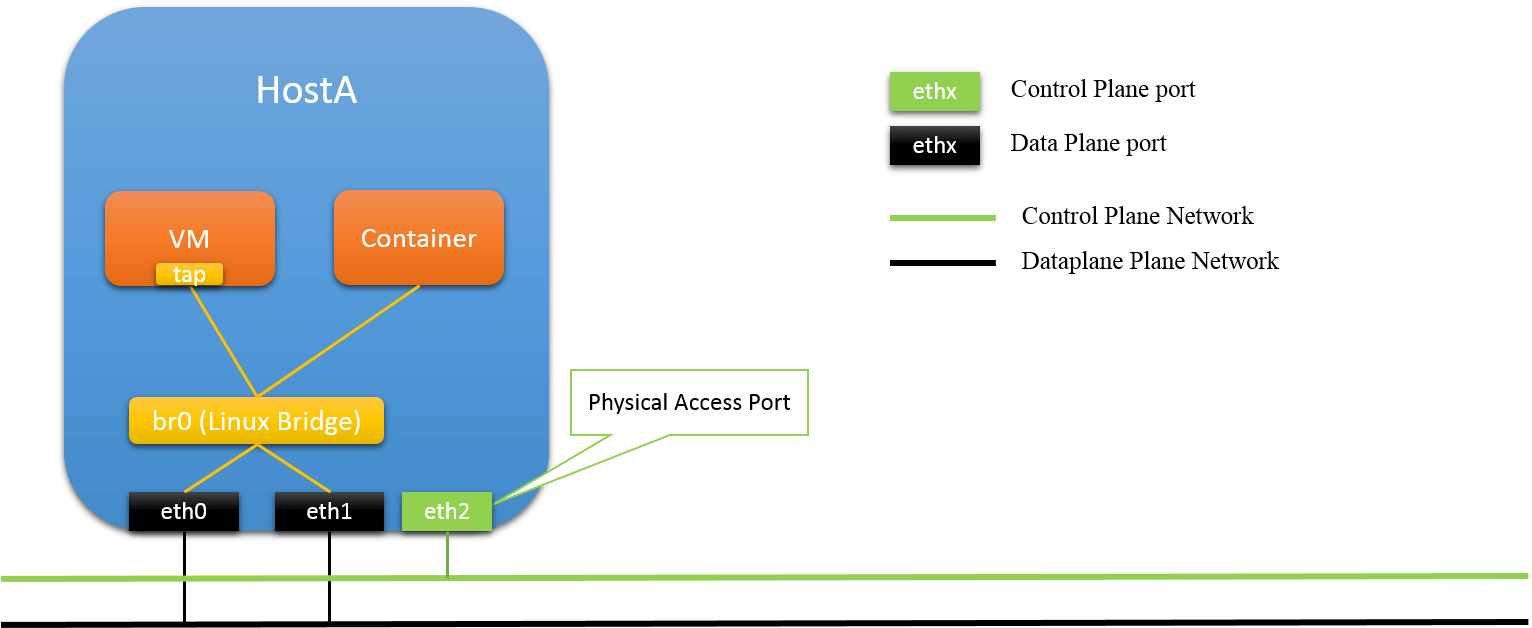
Fig.2.1 Physical Access Port
In this solution, a physical port is reserved for host accessing, and not connected to Linux bridge. It will be configured with an IP (thus L3 port), and all CP traffic will be transmited through it. Other ports are connected to Linux bridge (L2 ports), for DP forwarding.
pros:
-
CP/DP traffic isolation
-
robustness
even linux bridge misbehaves (e.g. crash), the host is still accessible
cons:
-
resource under-utilized
the access port is dedicated for accessing, which is wasteful
2.2 Solution 2: Virtual Accessing Port

Fig.2.2 Virtual Access Port
In this solution, a virtual port is created on the host, and configured with an IP address, used as accessing port. Since all physical ports are connected to Linux host, to make this accessing port reachable from outside, it has to connected to Linux bridge, too!
Then, some triky things come.
First, CP traffic, will also be sent/received through DP ports, as physical ports are the only places that could interact with outside, and all physical ports are DP ports.
Secondly, all egress packets of this host, are with source MAC that is none of the physical port MACs. For example, if you ping this host, the ICPM reply packet will be sent out from one of the physical ports, but, the source MAC of this packet is not the MAC of the physical port via which it is sent out.
We will verify this later. Now let’s continue to OVS - a more powerful software bridge.
3. OVS internal port
OVS is more powerful bridge than linux bridge, but since it is still a L2 bridge, some general bridge conventions it has to conform to.
Among those basic rules, one is that it should provide the ability to hold an IP for an OVS bridge: to be more clear, it should provide a similar functionality as Linux bridge’s virtual accessing port does. With this functionality, even if all physical port are added to OVS bridge, the host could still be accessible from outside (as we discussed in secion 2, without this, the host will lose connection).
OVS internal port is just for this purpose.
3.1 Usage
When creating an internal port on OVS bridge, an IP could be configured on it,
and the host is accessible by this IP address. Ordinary OVS users should not
worry about the implementation details, they just need to know that internal
ports act similar as linux tap devices.
Create an internal port vlan1000 on bridge br0, and configure
and IP on it:
$ ovs-vsctl add-port br0 vlan1000 -- set Interface vlan1000 type=internal

$ ifconfig vlan1000

$ ifconfig vlan1000 <ip> netmask <mask> up
3.2 Some Experiments
We have hostA, and the OVS bridge on hostA looks like this:
root@hostA # ovs-vsctl show
ce8cf3e9-6c97-4c83-9560-1082f1ae94e7
    Bridge br-bond
        Port br-bond
            Interface br-bond
                type: internal
        Port "vlan1000"
            tag: 1000
            Interface "vlan1000"
                type: internal
        Port "bond1"
            Interface "eth1"
            Interface "eth0"
    ovs_version: "2.3.1"
Two physical ports eth0 and eth1 is added to the bridge (bond), two internal ports br-bond (the default one of this bridge, not used) and vlan1000 (we created it). We make vlan1000 as the accessing port of this host by configuring an IP address on it:
root@hostA # ifconfig vlan1000 10.18.138.168 netmask 255.255.255.0 up

root@hostA # ifconfig vlan1000
vlan1000  Link encap:Ethernet  HWaddr a6:f2:f7:d0:1d:e6
          inet addr:10.18.138.168  Bcast:10.18.138.255  Mask:255.255.255.0
ping hostA from another host hostB (with IP 10.32.4.123), capture the packets on hostA and show the MAC address of L2 frames:
root@hostA # tcpdump -e -i vlan1000 'icmp'
10:28:24.176777 64:f6:9d:5a:bd:13 > a6:f2:f7:d0:1d:e6, 10.32.4.123   > 10.18.138.168: ICMP echo request
10:28:24.176833 a6:f2:f7:d0:1d:e6 > aa:bb:cc:dd:ee:ff, 10.18.138.168 > 10.32.4.123:   ICMP echo reply
10:28:25.177262 64:f6:9d:5a:bd:13 > a6:f2:f7:d0:1d:e6, 10.32.4.123   > 10.18.138.168: ICMP echo request
10:28:25.177294 a6:f2:f7:d0:1d:e6 > aa:bb:cc:dd:ee:ff, 10.18.138.168 > 10.32.4.123:   ICMP echo reply
We could see that the source MAC (a6:f2:f7:d0:1d:e6) of ICMP echo reply
packets is just the vlan1000’s address, not eth0 or eth1’s - although the
packets will be sent out from either eth0, or eth1. What this implies is that,
from the outside view, hostA is seen to have only one interface with
MAC address a6:f2:f7:d0:1d:e6, and no matter how many physical ports are on
hostA, as long as they are managed by the OVS (or linux bridge), these
physical ports will never be seen from the outside.
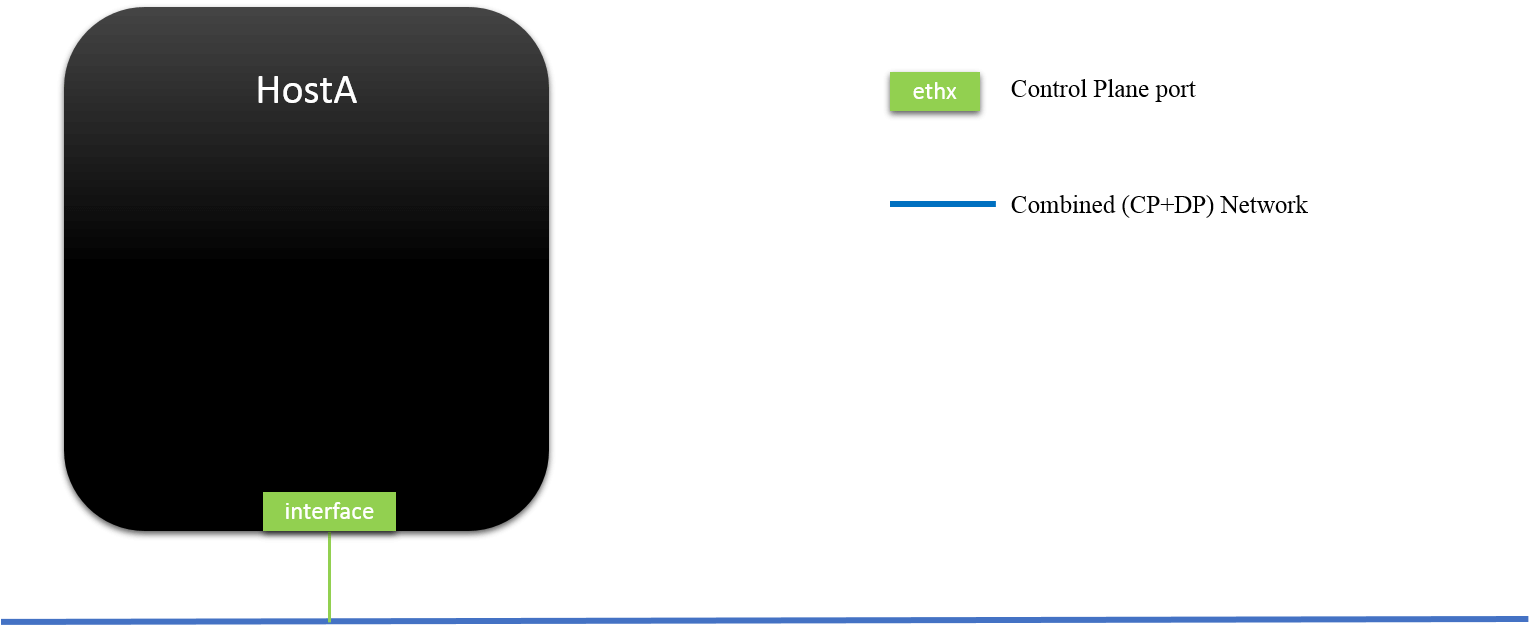
Fig.2.3 Outside L2/L3 View of Bridge Managed Host: Only L3 ports could be seen
3.3 Implementation (TODO: update)
In the underlying, the internal port is implemented through tap interface.
Quota some info from [1,2,3]:
The internal interface and port in each bridge is both an implementation
requirem ent and exists for historical reasons relating to the implementation of
Linux bridging module.

The purpose is to hold the IP for the bridge itself (just like some physical
bridges do). This is also useful in cases where a bridge has a physical
interface that would normally have its own IP. Since assigning a port to an IP
wouldn't happen in a physical bridge, assigning an IP to the physical interface
would be incorrect, as packets would stop at the port and not be passed across
the bridge.

A physical Ethernet device that is part of an Open vSwitch bridge should not
have an IP address. You can restore functionality by moving the IP address to an
Open vSwitch "internal" device, such as the network device named after the
bridge itself.

There is no compelling reason why Open vSwitch must work this way. However, this
is the way that the Linux kernel bridge module has always worked, so it's a
model that those accustomed to Linux bridging are already used to. Also, the
model that most people expect is not implementable without kernel changes on all
the versions of Linux that Open vSwitch supports.
4. Advanced Usage: interanl port as Container vNIC
You could create multiple internal ports on one OVS bridge, and more
importantly, since internal port is L3-accessible from outside and
socket-based (thus kernel stack based), it could be
used as virtual NIC, for VM or containers.
As containers have their own network namespaces, we could not connect container to OVS directly, the latter works in the default namespace. The typical way to solve this is to create a veth pair: move one end to container, and the other end attached to OVS.
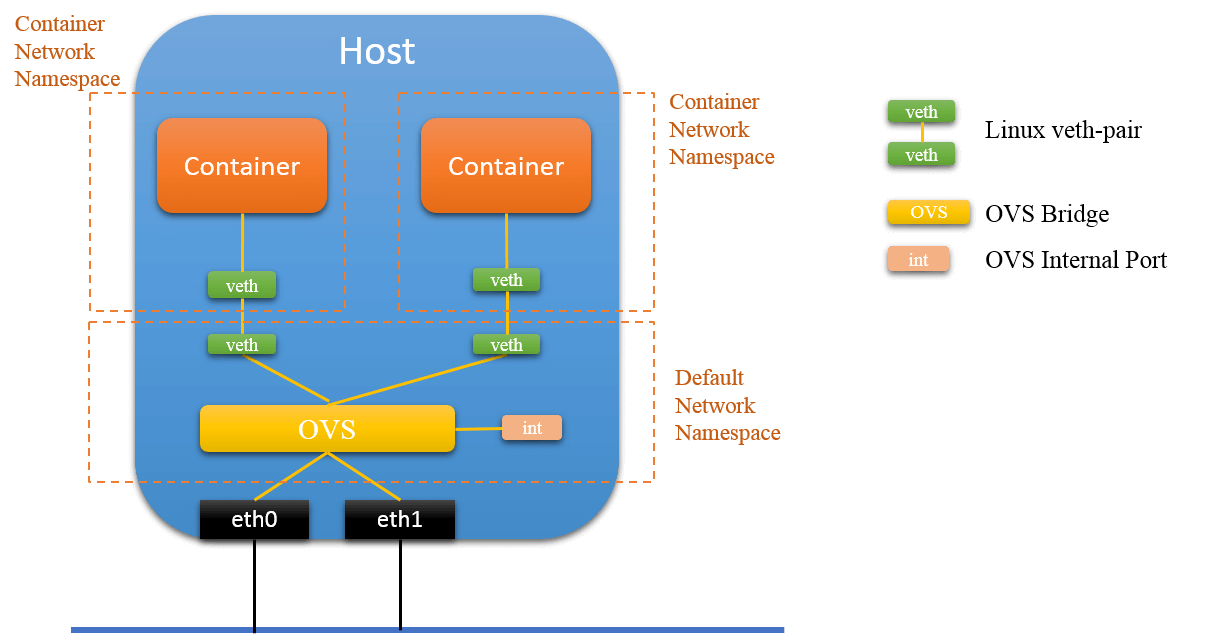
Fig.4.1 Connect to OVS via veth pair
This is simple and straitforward in concept, but will suffer from performance
issues. Could container
be connected to OVS directly? The answer is yes! We will use internal port to
accomplish this.

Fig.4.2 Connect to OVS via OVS Internal Port
4.1 Connect container to OVS via OVS Internal Port
The main steps are as follows:
- get the container’s network namespace, e.g.
ns1 - create an OVS internal port e.g. with name
tap_1 - move
tap_1from default namespace to container’s namespacens1 - disable the default network deive in
ns1, mostly probably, this is namedeth0 - configure IP for
tap_1, set it as the default network device ofns1, add default route - FINISH
I encapsulated the above procedures into scripts, here is the steps with this scripts:
connect container to ovs via ovs internal port
     |------------------------|    |------------------------|
     |       container1       |    |       container2       |
     |                        |    |                        |
     |   eth0   tap1  lo      |    |   eth0   tap2  lo      |
     |-----------|------------|    |-----------|------------|
                 |                             |
                 |                             |  container's network namespace
-----------------|-----------------------------|------------------------------
                 |                             |  default network namespace
                 |                             |
                 ---------------OVS-------------
                                 |
                               ------
                              /      \
                             |        |
                 (physical) eth0      eth1 (physical)
# 1. create two containers
$ ./run-containers.sh centos_1 centos_2

# 2. show container netns IDs, we will use these later
$ ./expose-container-netns.sh centos_1
<netns1>

$ ./expose-container-netns.sh centos_2
<netns2>

# 3. add a tap device to each container, the tap is on OVS and has type=internal
$ ./add-tap-to-container.sh centos_1 tap1 br0
$ ./add-tap-to-container.sh centos_2 tap2 br0

# 4. configure ip address, add default route
$ ip netns exec <netns1> ifconfig tap1 <ip1> netmask <netmask> up
$ ip netns exec <netns1> route add default gw <gw> dev tap1

$ ip netns exec <netns2> ifconfig tap2 <ip2> netmask <netmask> up
$ ip netns exec <netns2> route add default gw <gw> dev tap2

# 5. disable eth0
$ ip netns exec <netns1> ifconfig eth0 down
$ ip netns exec <netns2> ifconfig eth0 down

# 6. verify connectivity
$ ./attach-container.sh centos_1
root@<centos_1>#: ping <centos_2 ip>
UPDATE (2020.03): explicitly exposing container netns is cumbersome, instead, you could achieve the same effect as step 4 & 5 with tool
nsenter, see my later post Cilium Network Topology and Traffic Path on AWS for an example.
4.2 Performance Comparison (TODO: update)
Connect to OVS via internal port achieves (slightly?) better performance than via veth-pair.
References
- https://ask.openstack.org/en/question/4276/what-is-the-internal-interface-and-port-for-on-openvswitch/
- https://mail.openvswitch.org/pipermail/ovs-discuss/2013-August/030855.html
- http://blog.scottlowe.org/2012/10/30/running-host-management-on-open-vswitch/
- https://wiki.linuxfoundation.org/networking/bridge